Brussels Sprouts 'Long Island Improved'
Brassica oleracea var. gemmifera 'Long Island Improved'
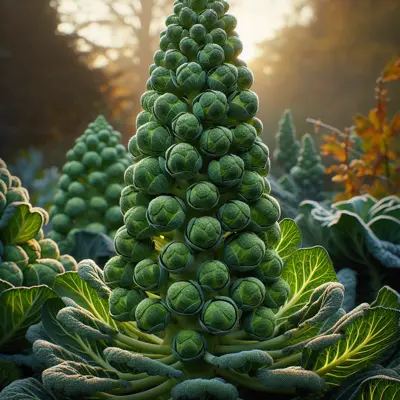
A reliable heirloom Brussels sprouts variety that produces abundant harvests of sweet, compact sprouts along tall, sturdy stalks. This cold-hardy variety actually improves in flavor after frost, developing a nutty sweetness that makes it perfect for roasting. An excellent choice for gardeners wanting to grow their own fresh Brussels sprouts without the bitterness often found in store-bought varieties.
Harvest
100-120d
Days to harvest
Sun
Full sun to partial shade
Zones
6–9
USDA hardiness
Height
10-24 inches
Planting Timeline
Showing dates for Brussels Sprouts 'Long Island Improved' in USDA Zone 7
All Zone 7 brassica →Zone Map
Click a state to update dates
Brussels Sprouts 'Long Island Improved' · Zones 6–9
Growing Details
Succession Planting
Brussels sprouts take 100-120 days to maturity, so succession planting isn't practical — you start them once per season and wait. In zone 7, sow seeds indoors in February or early March, transplant out in April or May, and the sprouts button up through fall. One sowing is all you get; start too late and you'll be chasing the crop into hard freezes before the heads form properly. The plants actually improve after a frost or two, which converts some starches to sugars, so there's no reason to rush harvest off the stalk once October rolls around.
Complete Growing Guide
To succeed with Long Island Improved, start seeds indoors 4-6 weeks before your first fall frost, as this cultivar is bred specifically for autumn harvest when cooler temperatures trigger its signature nutty flavor development. Plant in rich, well-draining soil with consistent moisture to prevent the splitting and loose sprout formation that plagues this variety under drought stress. This heirloom tends toward legginess if crowded, so space plants 24 inches apart to maximize air circulation and reduce susceptibility to fungal diseases like powdery mildew, which thrive in humid conditions. Watch for cabbage loopers and flea beetles in late summer, particularly on young transplants. The 100-120 day maturity means you should time planting so harvest occurs after a hard frost—this cold snap is non-negotiable for optimal sweetness. A practical trick: remove lower leaves as plants develop to improve air flow and redirect energy toward sprout production rather than leaf growth.
Light: Full sun (6 or more hours of direct sunlight a day), Partial Shade (Direct sunlight only part of the day, 2-6 hours). Soil: Clay, Loam (Silt), Sand. Soil pH: Acid (<6.0), Neutral (6.0-8.0). Drainage: Good Drainage, Moist. Height: 0 ft. 10 in. - 2 ft. 0 in.. Spread: 1 ft. 0 in. - 2 ft. 0 in.. Spacing: 12 inches-3 feet. Growth rate: Medium. Maintenance: Medium. Propagation: Seed, Stem Cutting. Regions: Coastal, Mountains, Piedmont.
Harvesting
Harvest Brussels sprouts when they reach one to one and a half inches in diameter with tight, compact heads that feel firm to gentle pressure; the outer leaves should display a deep blue-green color characteristic of this cultivar. This variety supports continuous harvesting by removing sprouts progressively from the bottom of the stalk upward as they mature, rather than waiting for all sprouts to finish simultaneously. For optimal flavor development, delay harvesting until after the first hard frost, which converts starches to sugars and produces the signature nutty sweetness this heirloom variety is prized for. Begin checking sprouts regularly once plants reach full height, as peak readiness can vary by several weeks depending on local temperature fluctuations.
The fruits dry and split when ripe.
Color: Brown/Copper, Green. Type: Siliqua. Length: > 3 inches.
Garden value: Edible
Harvest time: Fall, Summer
Edibility: The foliage is edible raw or cooked but when cooked can emit an unpleasant odor.
Storage & Preservation
Fresh Long Island Improved sprouts store best in the refrigerator crisper drawer, unwashed and loosely wrapped in perforated plastic bags. They'll maintain peak quality for 2-3 weeks when stored at 32-35°F with high humidity. Don't wash until ready to use, as excess moisture accelerates decay.
For longer storage, blanch whole sprouts in boiling water for 3-4 minutes depending on size, then immediately plunge into ice water. Once cooled and drained, freeze in airtight containers for up to 12 months. The post-frost sweetness of this variety makes frozen sprouts far superior to most store-bought options.
Fermenting is another excellent preservation method – quarter the sprouts and ferment like sauerkraut for 3-4 weeks. The natural sugars developed after frost create particularly flavorful fermented sprouts. You can also dehydrate halved sprouts at 125°F for 8-12 hours to create crispy chips that retain much of their nutty flavor.
History & Origin
This variety emerged from Long Island, New York's robust vegetable breeding tradition during the mid-twentieth century, though specific breeder attribution remains undocumented in widely accessible sources. 'Long Island Improved' represents a refinement of classical Brussels sprouts breeding, likely developed by local seed companies or agricultural extension programs capitalizing on the region's established reputation for vegetable production. The variety draws from the broader lineage of improved Brussels sprouts cultivars that gained prominence in American gardens following World War II, when heirloom seed preservation and regional varieties became increasingly valued. Its emphasis on cold-hardiness and post-frost flavor development reflects breeding priorities common to northeastern American cultivars adapted to harsh winter conditions.
Origin: W. Europe
Advantages
- +Flavor improves significantly after frost with nutty sweetness
- +Tall sturdy stalks produce abundant compact sprouts reliably
- +Cold-hardy heirloom variety eliminates store-bought bitterness problem
- +100-120 day maturity allows harvest before harsh winter
Considerations
- -Susceptible to multiple pests including cabbage worms and loopers
- -Requires 100-120 days making season timing critical for gardeners
- -Vulnerable to clubroot and black rot in poor drainage
- -Moderate difficulty demands consistent care and pest management
Companion Plants
Nasturtiums and marigolds both act as aphid trap crops — the aphids pile onto them instead of your sprouts, and you pull and trash the nasturtium stems when they get bad rather than letting the infestation spread. Thyme and onions work differently: their volatile sulfur compounds appear to interfere with the host-finding behavior of imported cabbageworm moths (Pieris rapae), which cuts down on egg-laying near the sprouts. Carrots and beets fill adjacent root depth without competing hard for the same resources and don't attract the same pest guild. Keep mustard out entirely — it's a brassica, so it shares the clubroot (Plasmodiophora brassicae) spore load and flea beetle pressure you're trying to keep off Long Island Improved. Tomatoes want different soil pH and inconsistent water compared to the steady 1-1.5 inches per week Brussels sprouts need, so they make poor neighbors on a practical level regardless of any chemical interaction.
Plant Together
Nasturtiums
Acts as trap crop for aphids and flea beetles, repels cucumber beetles
Thyme
Repels cabbage worms and whiteflies, attracts beneficial insects
Dill
Attracts beneficial wasps that parasitize cabbage worms
Onions
Repels cabbage root flies, aphids, and other brassica pests
Marigolds
Deters nematodes and general garden pests, attracts beneficial insects
Carrots
Loosens soil around Brussels sprouts roots, doesn't compete for nutrients
Celery
Natural pest deterrent that repels cabbage worms and aphids
Beets
Different root depth prevents competition, may improve soil structure
Keep Apart
Tomatoes
Both are heavy feeders competing for nutrients, tomatoes may stunt brassica growth
Strawberries
Inhibits Brussels sprouts growth and development through root competition
Mustard
Same family (Brassicaceae) attracts identical pests and diseases, depletes soil nutrients
Nutrition Facts
Per 100g serving. % Daily Value based on 2,000 calorie diet. Source: USDA FoodData Central (FDC #2685575)
Pests & Disease Resistance
Resistance
Good tolerance to clubroot and black rot
Common Pests
Cabbage worms, aphids, flea beetles, cabbage loopers
Diseases
Clubroot, black rot, downy mildew, powdery mildew
Troubleshooting Brussels Sprouts 'Long Island Improved'
What you'll see, why it happens, and what to do about it.
Leaves covered in white powdery coating, often starting on older growth mid-season
Likely Causes
- Powdery mildew (Erysiphe cruciferarum) — thrives in warm days with cool nights and poor airflow
- Crowded planting at less than 18-inch spacing
What to Do
- 1.Remove the worst-affected leaves and bin them — don't compost
- 2.Thin or stake plants so air moves between them
- 3.Apply a dilute baking soda spray (1 tablespoon per gallon of water) at first sign, or use a sulfur-based fungicide on a 7-day rotation
Plants wilting and yellowing despite adequate water; stunted growth with swollen, distorted roots when you pull one up
Likely Causes
- Clubroot (Plasmodiophora brassicae) — a soil-borne pathogen that persists in acidic soil for 20+ years
- Soil pH below 6.0, which favors clubroot spore activity
What to Do
- 1.Pull and bag infected plants immediately — do not compost
- 2.Lime the bed to raise soil pH to 7.0 or slightly above before replanting brassicas
- 3.Rotate brassicas out of that bed for at least 4 years; there is no chemical fix once the soil is infested
Small ragged holes chewed through leaves, especially on seedlings and young transplants; tiny dark beetles jumping off the foliage when disturbed
Likely Causes
- Flea beetles (Phyllotreta spp.) — most destructive in the first 3-4 weeks after transplant
- Transplanting into bare, unprotected soil during warm spells
What to Do
- 1.Cover transplants immediately with row cover (Agribon AG-19 or similar) and seal the edges to the ground — flea beetles will find any gap
- 2.Pull the cover once plants hit 6 inches tall and are putting on new growth steadily; they outgrow light feeding at that point
- 3.Dust diatomaceous earth around the base of plants to reduce pressure, but reapply after every rain
Frequently Asked Questions
How long does Brussels sprouts Long Island Improved take to grow?▼
Can you grow Long Island Improved Brussels sprouts in containers?▼
What does Long Island Improved Brussels sprouts taste like?▼
When should I plant Long Island Improved Brussels sprouts?▼
Is Long Island Improved Brussels sprouts good for beginners?▼
How do you know when Long Island Improved Brussels sprouts are ready to harvest?▼
Zone-by-Zone Planting Calendar
| Zone | Indoor Start | Transplant | Direct Sow | Harvest |
|---|---|---|---|---|
| Zone 1 | April – May | June – July | June – July | September – September |
| Zone 2 | April – May | June – July | May – July | September – September |
| Zone 11 | January – January | January – February | January – February | April – December |
| Zone 12 | January – January | January – February | January – February | April – December |
| Zone 13 | January – January | January – February | January – February | April – December |
| Zone 3 | March – April | May – June | May – June | August – October |
| Zone 4 | March – April | May – June | April – June | August – October |
| Zone 5 | February – March | April – May | April – May | August – November |
| Zone 6 | February – March | April – May | April – May | July – November |
| Zone 7 | February – March | April – May | March – May | July – November |
| Zone 8 | January – February | March – April | March – April | June – December |
| Zone 9 | January – January | February – March | February – March | May – December |
| Zone 10 | January – January | February – March | January – March | May – December |
Growing Guides from Wind River Greens
Sources & References
External authority sources used in compiling this guide.
See the Methodology page for how this data is sourced, what's AI-assisted, and known limitations.
More Brassicas
Build your planting calendar
Get a month-by-month schedule of when to start, transplant, and harvest.