Evergreen Hardy White
Allium fistulosum
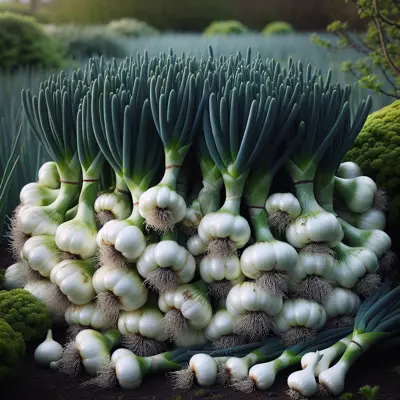
Evergreen Hardy White is an heirloom Allium variety prized for its mild, tender white onions with a delicate flavor less pungent than standard onions. Reaching maturity in approximately 65 days, this cold-hardy cultivar produces elongated white bulbs suitable for fresh eating and cooking. The plant tolerates a wide range of soil conditions and thrives in full sun to partial shade. Its hardiness and ease of cultivation make it an excellent choice for gardeners seeking a versatile, sweet onion option that stores moderately well and brings subtle onion flavor to dishes without overwhelming heat.
Harvest
65d
Days to harvest
Sun
Full sun to partial shade
Zones
4–9
USDA hardiness
Height
1-3 feet
Planting Timeline
Showing dates for Evergreen Hardy White in USDA Zone 7
All Zone 7 allium →Zone Map
Click a state to update dates
Evergreen Hardy White · Zones 4–9
Growing Details
Succession Planting
Direct sow Evergreen Hardy White every 3 weeks from March 1 through May in zone 7, then pick it back up with a late-summer sowing around August 15 through September for fall harvest. Stop the spring successions once daytime highs are consistently above 85°F — germination gets spotty and seedlings struggle to establish in the heat. This variety tolerates light frost well, down into the upper 20s°F, so the fall planting often runs through November without much trouble.
Each sowing takes about 65 days to full harvest, but you can start cutting individual stalks at 12 inches, which stretches any given planting's useful window by 3-4 weeks. If you let a few clumps divide and bulk up rather than cutting them hard, they'll keep producing without a new sowing at all.
Complete Growing Guide
Light: Full sun (6 or more hours of direct sunlight a day), Partial Shade (Direct sunlight only part of the day, 2-6 hours). Soil: High Organic Matter, Loam (Silt), Sand. Drainage: Good Drainage. Height: 1 ft. 0 in. - 3 ft. 0 in.. Spread: 0 ft. 6 in. - 2 ft. 0 in.. Spacing: Less than 12 inches. Growth rate: Medium. Maintenance: Low. Propagation: Division. Regions: Coastal, Mountains, Piedmont.
Harvesting
The capsule splits longitudinally and contains small round black seeds.
Type: Capsule.
Storage & Preservation
Fresh harvested shoots store best in the refrigerator, lasting 7-10 days when wrapped in damp paper towels inside a plastic bag. Keep the white and green portions intact until use—trimming exposes cut surfaces that deteriorate quickly.
For longer preservation, slice shoots into ¼-inch pieces and freeze in single-use portions. They maintain good texture for cooked applications for up to 8 months. Dehydrating works well too—clean shoots thoroughly, chop, and dry until crisp, then store in airtight containers.
Fermenting creates a tangy condiment similar to kimchi—pack chopped shoots with 2% salt by weight and ferment at room temperature for 3-5 days before refrigerating. The mild flavor also makes these excellent for quick pickling in rice vinegar with a touch of sugar, ready to use within 24 hours.
History & Origin
Origin: Northern Hemisphere, North America and Eurasia
Advantages
- +Attracts: Bees, Butterflies
- +Low maintenance
Considerations
- -Toxic (Bark, Flowers, Fruits, Leaves, Roots, Seeds, Stems): Low severity
Companion Plants
Roses, tomatoes, peppers, and brassicas all do well near Evergreen Hardy White. Allium fistulosum releases sulfur compounds that disrupt the host-finding behavior of aphids and certain soft-bodied insects — genuinely useful tucked at the base of roses or interplanted with pepper transplants every 6 inches or so. Carrots make a practical neighbor because they root 8-12 inches down while bunching onions stay shallow, so the two aren't pulling from the same soil zone. Marigolds add a further pest-confusing layer, and in our zone 7 Georgia garden that combination holds up through the long, pressured summer better than either plant alone.
Beans and peas need to stay at least a full bed away — those same sulfur compounds that deter insects appear to suppress legume growth, and you'll see it in stunted plants and reduced yields. Asparagus is a bad match for a different reason: it's a long-term perennial that resents any competition near its crown, and bunching onions planted close enough to matter will cut into its productivity for years, not just one season.
Plant Together
Roses
Alliums repel aphids, thrips, and other pests that commonly attack roses
Tomatoes
Alliums deter aphids, spider mites, and may help prevent fungal diseases
Carrots
Alliums repel carrot flies while carrots help break up soil for allium bulbs
Brassicas
Alliums deter cabbage worms, aphids, and flea beetles from cabbage family plants
Lettuce
Alliums repel aphids and slugs that damage lettuce leaves
Strawberries
Alliums deter slugs, aphids, and may help prevent fungal diseases in strawberry beds
Peppers
Alliums repel aphids and spider mites while not competing for nutrients
Marigolds
Both repel similar pests and create a strong pest-deterrent combination
Keep Apart
Beans
Alliums can inhibit nitrogen fixation and overall growth of legumes
Peas
Sulfur compounds in alliums can stunt pea growth and reduce pod production
Asparagus
Alliums can compete aggressively and may inhibit asparagus spear development
Nutrition Facts
Per 100g serving. % Daily Value based on 2,000 calorie diet. Source: USDA FoodData Central (FDC #170000)
Pests & Disease Resistance
Resistance
Good general disease resistance, very hardy and tolerant of weather extremes
Common Pests
Onion thrips, aphids, leaf miners
Diseases
Downy mildew, purple blotch, rust
Troubleshooting Evergreen Hardy White
What you'll see, why it happens, and what to do about it.
Silvery streaking or stippling on leaves, tips browning and distorted, plants looking generally rough in June or July
Likely Causes
- Onion thrips (Thrips tabaci) — tiny, pale insects that rasp leaf tissue and hide in the tight inner leaves
- Hot, dry stretches that stress the plant and make it more susceptible
What to Do
- 1.Blast foliage with a strong stream of water in the early morning to knock thrips off — do this 3 days in a row
- 2.Apply spinosad-based spray if populations are heavy; follow label intervals, usually every 7 days
- 3.Keep soil consistently moist (1 inch per week); stressed bunching onions attract thrips faster than healthy ones
Pale, water-soaked patches on leaves that turn gray-purple and fuzzy on the undersides, spreading fast in cool wet weather
Likely Causes
- Downy mildew (Peronospora destructor) — an oomycete that thrives when nights are below 65°F and humidity is high
- Overcrowded planting that traps moisture between stalks
What to Do
- 1.Remove and bag (don't compost) any infected leaves immediately
- 2.Space clumps at least 6 inches apart to get air moving; thin dense clumps to 2-3 stalks
- 3.Avoid overhead watering in the evening — drip irrigation or early-morning hand watering keeps foliage dry overnight
Small, oval orange or rusty-brown pustules scattered across the outer leaves, showing up mid-season
Likely Causes
- Allium rust (Puccinia allii) — a fungal disease that spreads by wind-borne spores, picks up in humid conditions
- Dense plantings or nearby infected alliums left in the ground from a previous season
What to Do
- 1.Strip affected outer leaves and dispose of them in the trash
- 2.Apply a sulfur-based fungicide at first sign; reapply every 10-14 days if conditions stay humid
- 3.Rotate bunching onions out of the same bed for at least 2 seasons, and pull any volunteer alliums that could harbor spores
Frequently Asked Questions
How long does Evergreen Hardy White take to grow?▼
Can you grow Evergreen Hardy White in containers?▼
Is Evergreen Hardy White good for beginners?▼
What does Evergreen Hardy White taste like?▼
When should I divide Evergreen Hardy White clumps?▼
Will Evergreen Hardy White survive winter in cold climates?▼
Zone-by-Zone Planting Calendar
| Zone | Indoor Start | Transplant | Direct Sow | Harvest |
|---|---|---|---|---|
| Zone 1 | — | — | June – July | August – September |
| Zone 2 | — | — | May – July | July – September |
| Zone 11 | — | — | January – February | February – December |
| Zone 12 | — | — | January – February | February – December |
| Zone 13 | — | — | January – February | February – December |
| Zone 3 | — | — | May – June | July – October |
| Zone 4 | — | — | April – June | June – October |
| Zone 5 | — | — | April – May | June – November |
| Zone 6 | — | — | April – May | June – November |
| Zone 7 | — | — | March – May | May – November |
| Zone 8 | — | — | March – April | May – December |
| Zone 9 | — | — | February – March | April – December |
| Zone 10 | — | — | January – March | March – December |
Growing Guides from Wind River Greens
Sources & References
External authority sources used in compiling this guide.
See the Methodology page for how this data is sourced, what's AI-assisted, and known limitations.
More Alliums
Build your planting calendar
Get a month-by-month schedule of when to start, transplant, and harvest.