Radish Microgreens
Raphanus sativus
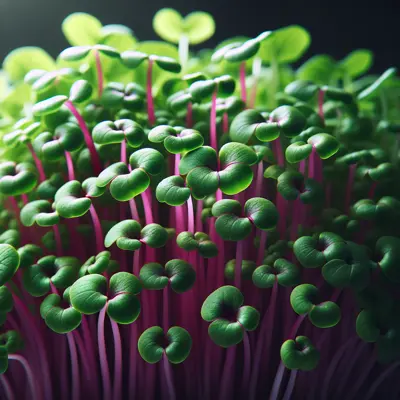
Radish microgreens are young radish plants harvested at 10-14 days of growth, featuring delicate green shoots with characteristic pink or reddish cotyledons (seed leaves). Ready to harvest in approximately 30 days from planting, they deliver an intense, peppery spice that ranges from mild to fiercely hot depending on variety and growing conditions. These heirloom microgreens add vibrant color and bold peppery crunch to salads, sandwiches, soups, and garnishes. Their spicy profile makes them ideal for Asian cuisine and adds complexity to bland dishes. Easy to grow under moderate to bright light with minimal pest pressure, radish microgreens are popular among home and commercial growers seeking quick harvests with maximum flavor impact.
Harvest
30d
Days to harvest
Sun
Moderate to bright light
Zones
2–11
USDA hardiness
Height
0-3 feet
Planting Timeline
Showing dates for Radish Microgreens in USDA Zone 7
All Zone 7 microgreen →Zone Map
Click a state to update dates
Radish Microgreens · Zones 2–11
Growing Details
Succession Planting
Radish microgreens are one of the few crops where a 5-7 day sowing stagger makes more sense than the 14-day cycles you'd use for field crops. Sow a fresh 10x20 tray every 5-7 days and you'll harvest continuously without a gap — at 7-10 days to maturity, the window closes fast and you don't want to be caught with nothing ready. This runs year-round indoors since the only variables you're managing are light, temperature (65-75°F), and moisture.
One seasonal adjustment worth making: if your grow space isn't air-conditioned and temperatures creep above 80°F in summer, germination gets erratic and Pythium-driven damping off risk climbs. Either shift trays to a cooler room or tighten your sowing interval to every 3-4 days so no tray sits in marginal heat any longer than it has to.
Complete Growing Guide
Start your radish microgreen journey by selecting a shallow growing tray, ideally 1-2 inches deep with drainage holes. Fill with a fine-textured, well-draining potting mix or use coconut coir for hydroponic growing. The growing medium should be moist but not waterlogged – think of a wrung-out sponge consistency.
While soaking radish seeds for 4-8 hours can improve germination rates, it's optional for most varieties. Soak larger seeds like Cherry Belle, but smaller varieties like China Rose can be sown directly. Scatter seeds densely across your growing medium – aim for about 1 tablespoon per 5x5 inch tray. Unlike full-size radishes, microgreens benefit from close spacing since you're harvesting before root development.
Press seeds gently into the surface but don't bury them completely. Cover your tray with a humidity dome or another inverted tray to create the dark, humid environment that encourages rapid germination. Place in a warm area (65-75°F) for the first 2-3 days until you see the first green leaves emerging.
Once cotyledons appear, remove the cover and move trays under grow lights or to a bright windowsill. Radish microgreens need 12-14 hours of light daily – insufficient light leads to leggy, pale shoots with diminished flavor. If using grow lights, position them 12-18 inches above the trays.
Water from the bottom by placing trays in a larger water-filled container for 10-15 minutes, allowing the growing medium to absorb moisture through drainage holes. This prevents disturbing the delicate shoots and reduces damping-off risk. Never mist the leaves directly as this promotes fungal issues.
Avoid fertilizing entirely – radish microgreens derive all necessary nutrients from the seed itself. Adding fertilizer can actually delay harvest and create bitter flavors. Your biggest enemy is overwatering, which causes the dreaded 'black leg' damping-off disease. If you notice dark, mushy stems at soil level, increase air circulation and reduce moisture immediately.
Harvesting
Harvest radish microgreens when the first true leaves begin to appear, typically 5-8 days after sowing. The cotyledons should be fully opened and vibrant green, with stems reaching 1-2 inches in height. The perfect harvest window is narrow – wait too long and the intense peppery bite becomes overpowering and bitter.
Test readiness by gently tugging a few shoots – they should offer slight resistance but pull cleanly from the growing medium. Stems should be crisp and turgid, not limp or yellowing. Harvest in the morning when shoots are most hydrated and flavorful.
Use sharp scissors or a clean knife to cut stems about ¼ inch above the soil line. Cut in small sections rather than harvesting the entire tray at once, unless you plan to use them immediately. Avoid pulling or twisting, which can disturb neighboring plants and introduce soil particles. Rinse gently in cold water immediately after cutting, then shake dry before storing or serving.
Storage & Preservation
Fresh radish microgreens are highly perishable and best used within 2-3 days of harvest. Store unwashed microgreens in the refrigerator between damp paper towels inside a perforated plastic bag, maintaining humidity while allowing air circulation. Keep temperature around 35-38°F – standard refrigerator temperature is ideal.
For immediate use, wash and thoroughly dry microgreens, then store in airtight containers lined with paper towels for up to 5 days. Change paper towels if they become soggy. Never store wet microgreens as they'll quickly develop slime and off-flavors.
Radish microgreens don't freeze, dry, or preserve well due to their high water content and delicate structure. However, you can incorporate them into compound butters or herb oils for short-term preservation. Blend fresh microgreens with olive oil and freeze in ice cube trays for convenient flavor additions to soups and stir-fries.
History & Origin
Radish microgreens emerged from the broader microgreen movement that began in San Francisco restaurants during the 1980s, though radishes themselves have been cultivated for over 4,000 years. The practice of growing microgreens commercially started when high-end chefs sought intense flavors and unique presentations for their dishes.
While full-size radishes originated in Southeast Asia and were among the first vegetables grown by early civilizations, the concept of harvesting them as microgreens is relatively modern. The technique gained momentum in the 1990s as hydroponic growing systems made year-round production feasible for restaurants and home gardeners alike.
Radish microgreens became particularly popular because they showcase the plant's signature peppery bite in concentrated form, delivering the same flavor punch as mature radishes in just days rather than weeks. Different radish varieties – from mild Daikon to fiery Cherry Belle – offer diverse heat levels and colors when grown as microgreens, making them favorites among chefs for both flavor and visual appeal.
Advantages
- +Extremely fast harvest cycle at just 5-8 days from seed to table
- +Requires no fertilizer since seeds provide all necessary nutrients
- +Delivers intense, concentrated radish flavor in small portions
- +Beautiful purple and green stems add visual interest to dishes
- +Excellent disease resistance due to rapid growth preventing pathogen establishment
- +Can be grown year-round indoors with basic equipment
- +High germination rates even without seed pre-treatment
Considerations
- -Extremely short storage life of only 2-3 days after harvest
- -Cannot be preserved through traditional methods like drying or freezing
- -Flavor can become overwhelmingly hot if harvested too late
- -Requires daily attention during the brief growing period
- -Prone to sudden collapse from damping-off if overwatered
Companion Plants
Radish microgreens grown in trays aren't exactly sharing soil with their neighbors the way field crops do, so most companion planting logic doesn't translate directly. What matters here is what you're growing on the same rack or shelf. Lettuce, spinach, arugula, and kale microgreens are practical tray-mates because they run on the same light schedule — 12-14 hours — and tolerate the same watering cadence, so you're not optimizing one crop at the expense of another. Mustard greens are worth pairing with radish specifically because germination timing is nearly identical at 2-4 days; in a mixed tray, you won't end up with one half of the flat a week ahead of the other and scrambling to harvest unevenly.
Broccoli and cabbage are worth keeping on a separate shelf. Both are brassicas that release glucosinolate breakdown products as they grow, and in the tight quarters of a grow rack, those compounds can stress tender neighboring seedlings. Fennel is the one to avoid most strictly — it's allelopathic across a wide range of plants even in field conditions, and there's no upside to crowding fennel microgreens next to radish. Give them at least 12 inches of separation if rack space is tight, or just put them on a different tier entirely.
Plant Together
Lettuce
Compatible growing conditions and harvesting timeline, efficient use of growing space
Spinach
Similar water and light requirements, can be grown together in succession plantings
Arugula
Both are fast-growing brassicas with similar care needs and harvest timing
Chives
Natural pest deterrent that repels aphids and other small insects
Cilantro
Attracts beneficial insects and has similar quick-growing microgreen characteristics
Pea Shoots
Complementary growth habits and both thrive in cool, moist conditions
Kale
Fellow brassica with compatible growing requirements and pest resistance
Mustard Greens
Same plant family with identical growing conditions and natural pest deterrent properties
Keep Apart
Broccoli
Competition between brassica family members can lead to stunted growth and nutrient depletion
Cabbage
Same family plants compete for nutrients and may attract concentrated pest populations
Fennel
Allelopathic properties inhibit germination and growth of most other plants including radishes
Nutrition Facts
Per 100g serving. % Daily Value based on 2,000 calorie diet. Source: USDA FoodData Central (FDC #169276)
Pests & Disease Resistance
Resistance
Excellent disease resistance due to rapid growth cycle
Common Pests
Flea beetles, aphids (rare in microgreen production)
Diseases
Damping off, root rot from excessive moisture
Troubleshooting Radish Microgreens
What you'll see, why it happens, and what to do about it.
Seeds sprout unevenly or not at all by day 3-4, with bare patches across the tray
Likely Causes
- Uneven seed distribution — seeds clumped during sowing
- Low germination rate from old or improperly stored seed
- Tray surface dried out during the blackout/germination phase
What to Do
- 1.Pre-soak seeds 4-6 hours before sowing to jump-start germination, then spread in a single even layer
- 2.Keep a humidity dome or damp paper towel over the tray for the first 2-3 days; check moisture twice daily
- 3.Buy fresh radish seed each season — germination rates drop noticeably after 1-2 years in storage
Seedlings collapse at the soil line, fall over, and rot — usually between days 5 and 7
Likely Causes
- Damping off — most commonly Pythium or Rhizoctonia fungi — triggered by overwatering and poor airflow
- Seeding medium staying waterlogged rather than just moist
What to Do
- 1.Switch to bottom-watering: pour water into the tray below and let the growing medium wick it up; stop misting the stems directly
- 2.Run a small fan on low nearby — even 30 minutes of airflow twice a day cuts damping off significantly
- 3.Pull the whole tray if it happens; there's no recovering a microgreen flat with active damping off
Stems are pale and stretching more than 3 inches before the first true leaf appears
Likely Causes
- Etiolation from insufficient light — grow light too far away or natural light under 12 hours
- Blackout period extended too long past the point of germination
What to Do
- 1.Move grow lights to 2-4 inches above the tray canopy; most T5 and LED grow bars need to be closer than you'd expect
- 2.Once 75% of seeds have sprouted, pull them out of the blackout setup immediately — don't wait for 100%
- 3.Aim for 12-14 hours of light daily; a basic outlet timer costs about $10 and removes the guesswork
Tiny jumping insects on the greens or trays, with small ragged holes chewed into the cotyledon leaves
Likely Causes
- Flea beetles (Phyllotreta spp.) — common in southeastern grow spaces, especially if trays are near a door or window with outdoor access
- Trays placed too close to soil or outdoor growing areas
What to Do
- 1.In our zone 7 Georgia setup, flea beetles are most active March through October — keep trays indoors away from exterior doors during that stretch
- 2.Cover trays with fine mesh until harvest; at the 7-10 day window, covering is faster than any spray option
- 3.Harvest promptly at the cotyledon stage — trays sitting past day 12-14 are more exposed and more likely to draw pests
Frequently Asked Questions
How long do radish microgreens take to grow?▼
Do radish microgreens taste like regular radishes?▼
Can you grow radish microgreens without soil?▼
Why are my radish microgreens falling over?▼
Should I soak radish seeds before planting microgreens?▼
How much light do radish microgreens need?▼
Zone-by-Zone Planting Calendar
| Zone | Indoor Start | Transplant | Direct Sow | Harvest |
|---|---|---|---|---|
| Zone 1 | January – December | — | — | January – December |
| Zone 2 | January – December | — | — | January – December |
| Zone 11 | January – December | — | — | January – December |
| Zone 12 | January – December | — | — | January – December |
| Zone 13 | January – December | — | — | January – December |
| Zone 3 | January – December | — | — | January – December |
| Zone 4 | January – December | — | — | January – December |
| Zone 5 | January – December | — | — | January – December |
| Zone 6 | January – December | — | — | January – December |
| Zone 7 | January – December | — | — | January – December |
| Zone 8 | January – December | — | — | January – December |
| Zone 9 | January – December | — | — | January – December |
| Zone 10 | January – December | — | — | January – December |
Growing Guides from Wind River Greens
Sources & References
External authority sources used in compiling this guide.
See the Methodology page for how this data is sourced, what's AI-assisted, and known limitations.
More Microgreens
Build your planting calendar
Get a month-by-month schedule of when to start, transplant, and harvest.