Amaranth Microgreens
Amaranthus tricolor
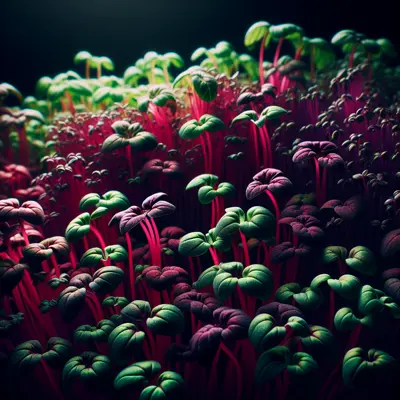
Amaranth microgreens are delicate, tender shoots with small rounded cotyledons and fine stems that reach full harvest in 50 days. They display vibrant green coloring with a slightly purplish tinge. These microgreens are prized for their mild, earthy flavor profile with subtle sweetness and mineral undertones, making them ideal for salads, smoothies, and garnishes. Amaranth microgreens pack a nutritional punch with high levels of protein, vitamins, and minerals. Their defining characteristic is their exceptional tenderness and visual appeal, combined with easy cultivation and minimal pest pressure, making them perfect for both novice and experienced microgreen growers.
Harvest
50d
Days to harvest
Sun
Full sun to partial shade
Zones
2–11
USDA hardiness
Height
1-5 feet
Planting Timeline
Showing dates for Amaranth Microgreens in USDA Zone 7
All Zone 7 microgreen →Zone Map
Click a state to update dates
Amaranth Microgreens · Zones 2–11
Growing Details
Succession Planting
Amaranth microgreens go from seed to harvest in roughly 7–10 days — the "50 days to harvest" figure is for full-size Amaranthus tricolor plants, not the microgreen cut. That short window means you can start a fresh tray every 3–4 days and keep a near-continuous supply going. Drop a new tray when your current one hits day 4 or 5 and you'll have overlap without a gap.
Because these are indoor tray crops, outdoor seasons don't constrain you — January through December works in any zone. The practical limit is heat: if your growing space climbs above 80°F for extended stretches, germination gets erratic and mold pressure rises. In summer, pull trays away from south-facing windows that collect afternoon sun, or move them to a climate-controlled room.
Complete Growing Guide
Amaranth microgreens require patience compared to faster-growing varieties, needing the full 50 days to develop their signature burgundy coloring and heart-shaped leaves. These plants thrive in warm conditions between 70-75°F and prefer consistent moisture without waterlogging, which can trigger damping-off disease in the seedling stage. Unlike delicate microgreens, amaranth is vigorous and prone to stretching in low light, so provide 12-14 hours of bright, direct light daily to maintain compact growth and intensify the striking red undersides. Watch for spider mites in dry indoor environments, as this cultivar attracts them readily. The most practical tip is harvesting the rosettes from the plant tops rather than cutting at soil level—this technique maximizes the visual appeal of the burgundy-tinged leaves for garnishes while allowing regrowth for successive harvests, making amaranth microgreens exceptionally productive for home gardeners.
Light: Full sun (6 or more hours of direct sunlight a day), Partial Shade (Direct sunlight only part of the day, 2-6 hours). Drainage: Good Drainage. Height: 1 ft. 6 in. - 5 ft. 0 in.. Spread: 1 ft. 0 in. - 2 ft. 0 in.. Spacing: 12 inches-3 feet. Growth rate: Medium. Maintenance: Low. Propagation: Seed.
Harvesting
Amaranth microgreens reach peak harvest readiness when the cotyledons have fully expanded and the burgundy-red coloration becomes prominent on both the upper surface and striking undersides of the leaves, typically occurring around day 7-10. The stems should feel firm yet tender when gently pinched, and the overall height should reach approximately 1-2 inches. For continuous harvesting, cut just above the soil line using clean scissors, which encourages multiple flushes from the same tray over several weeks. Alternatively, single-harvest methods involve removing entire plants at once, yielding those beautiful multicolored rosettes ideal for soup garnishes. A key timing tip: harvest in the early morning after the dew has dried but before midday heat, as this maximizes the delicate leaves' crispness and preserves their mild, earthy flavor with subtle mineral notes.
Type: Achene.
Edibility: Seeds, leaves
Storage & Preservation
Store freshly harvested amaranth microgreens in a breathable container lined with paper towels to absorb excess moisture, then refrigerate at 35–40°F with 85–90% humidity. They'll keep for 5–7 days when stored this way, though peak flavor and texture fade after 3–4 days. For longer preservation, freezing works best: pat microgreens dry, spread on a tray until solid, then transfer to freezer bags for up to two months—use thawed greens in smoothies or cooked dishes rather than fresh applications. Drying is also viable; arrange thinly on screens in a warm, dark space with good airflow until completely crisp, then store in airtight containers away from light. The vibrant pigmentation of amaranth varieties fades noticeably when frozen or dried, so prioritize refrigeration for visual appeal in fine dining garnishes, or reserve preserved batches for blended applications.
History & Origin
Amaranth microgreens descend from Amaranthus tricolor, a species with deep roots in Asian and African agriculture spanning thousands of years. While the parent plant has been cultivated as a leafy vegetable and grain crop across tropical and subtropical regions, the specific microgreen cultivation of this variety is a modern agricultural development emerging from the broader microgreens movement of the late twentieth century. Detailed documentation of its introduction as a microgreen variety by particular seed companies or breeders remains limited in published sources. However, its accessibility and ease of cultivation have made it a standard offering among microgreen producers and seed suppliers, building upon the established culinary and nutritional reputation of mature amaranth leaves in traditional cuisines.
Origin: Tropical Asia
Advantages
- +Striking burgundy-red coloring makes amaranth microgreens visually appealing for plating
- +Mild, earthy flavor complements soups and mixed green dishes well
- +Easy difficulty level suitable for beginners growing microgreens at home
- +Multicolored rosettes yield beautiful garnish options when tops are cut
- +Few pest and disease issues when growing conditions are properly maintained
Considerations
- -Fifty-day growing cycle is longer than many popular microgreen varieties
- -Occasional aphid infestations require careful monitoring and pest management
- -Heart-shaped leaves can be delicate and prone to damage during harvest
Companion Plants
Amaranth microgreens are tray crops, so companion planting here means what you grow on the same shelf or bench. Basil, cilantro, and arugula are good neighbors because they share the same misting schedule and thrive in the 6.0–7.5 pH range — no competition for moisture or root space since everyone's in their own tray. Radish microgreens and pea shoots are especially practical pairings: radish germinates in 2–3 days and pea shoots in 2–5, so staggering them with your amaranth (which also germinates in 2–5 days) keeps your cutting rotation tight without any bench space sitting idle.
Fennel is the one to pull off the shelf entirely. It produces volatile allelopathic compounds that suppress germination in neighboring crops — in our zone 7 Georgia gardens where trays run indoors year-round, that proximity isn't theoretical. Mint causes a similar low-level suppression. Brassica microgreens (broccoli, cabbage) are a different problem: they grow faster and taller than amaranth, shade it out by day 5 or 6, and draw the same aphid pressure, so give them their own shelf if you're running both.
Plant Together
Basil
Repels aphids and whiteflies that commonly attack microgreens
Chives
Natural pest deterrent and doesn't compete for space in microgreen setups
Lettuce
Similar growing conditions and harvest timing, good companion crop
Radish Microgreens
Fast-growing companion with similar light and water requirements
Cilantro
Compatible growing conditions and helps attract beneficial insects
Spinach
Similar cool-season preferences and non-competitive root systems
Pea Shoots
Nitrogen-fixing properties benefit nearby plants, similar harvest timing
Arugula
Compatible growth rates and pest resistance helps protect tender amaranth
Keep Apart
Fennel
Allelopathic compounds inhibit germination and growth of most plants
Black Walnut
Produces juglone which is toxic to amaranth and inhibits growth
Brassica Microgreens
May release compounds that inhibit amaranth seed germination
Mint
Aggressive growth and strong aromatic oils can overwhelm delicate amaranth microgreens
Nutrition Facts
Per 100g serving. % Daily Value based on 2,000 calorie diet. Source: USDA FoodData Central (FDC #167782)
Pests & Disease Resistance
Resistance
Excellent disease resistance, very hardy
Common Pests
Few pest issues, occasional aphids
Diseases
Rarely affected by diseases when properly grown
Troubleshooting Amaranth Microgreens
What you'll see, why it happens, and what to do about it.
Seedlings stretching tall and thin (leggy), stems flopping over by day 4–5
Likely Causes
- Insufficient light — less than 4 hours of direct sun or grow-light too far above the tray
- Overwatering keeping the growing medium waterlogged, which weakens stem cell structure
What to Do
- 1.Move trays to a south-facing window or drop grow-lights to 2–3 inches above the canopy
- 2.Let the surface dry slightly between mistings — 2–3 times daily is the ceiling, not the floor
- 3.Harvest earlier, around day 7–9, before stems get any weaker
Fuzzy white or gray coating on stems at the soil line, noticed around day 3–6
Likely Causes
- Saprophytic mold or Botrytis cinerea — both thrive when moisture sits trapped under a dense seed mass with no airflow
- Seeds sown without enough surface drainage in the growing medium
What to Do
- 1.Run a small fan on low nearby — even indirect airflow cuts mold significantly
- 2.Back off misting by one session per day until the surface isn't staying visibly wet between waterings
- 3.If the mold is only on shed seed hulls or the medium surface and not climbing the stems, scrape it off and harvest immediately — the greens are still edible
Clusters of small soft-bodied insects on cotyledons, usually greenish or black, noticed after day 6
Likely Causes
- Aphids — NC State Extension notes these are one of the few pests that show up on amaranth, typically migrating in from a nearby infested plant rather than appearing spontaneously in a clean tray
What to Do
- 1.Harvest immediately if the tray is at or near the 7–10 day mark — don't wait them out
- 2.Rinse harvested greens thoroughly under cold running water before eating
- 3.Check any full-size plants or other crops nearby and deal with the source so it doesn't keep cycling back to your trays
Frequently Asked Questions
How long do amaranth microgreens take to grow?▼
Can you grow amaranth microgreens without soil?▼
What do amaranth microgreens taste like?▼
Do amaranth microgreens need special lighting?▼
Can you regrow amaranth microgreens after cutting?▼
Are amaranth microgreens good for beginners?▼
Zone-by-Zone Planting Calendar
| Zone | Indoor Start | Transplant | Direct Sow | Harvest |
|---|---|---|---|---|
| Zone 1 | January – December | — | — | January – December |
| Zone 2 | January – December | — | — | January – December |
| Zone 11 | January – December | — | — | January – December |
| Zone 12 | January – December | — | — | January – December |
| Zone 13 | January – December | — | — | January – December |
| Zone 3 | January – December | — | — | January – December |
| Zone 4 | January – December | — | — | January – December |
| Zone 5 | January – December | — | — | January – December |
| Zone 6 | January – December | — | — | January – December |
| Zone 7 | January – December | — | — | January – December |
| Zone 8 | January – December | — | — | January – December |
| Zone 9 | January – December | — | — | January – December |
| Zone 10 | January – December | — | — | January – December |
Growing Guides from Wind River Greens
Sources & References
External authority sources used in compiling this guide.
See the Methodology page for how this data is sourced, what's AI-assisted, and known limitations.
More Microgreens
Build your planting calendar
Get a month-by-month schedule of when to start, transplant, and harvest.