Pea Shoots
Pisum sativum
Yellow peas are a great non-GMO protein source and are becoming more prevalent in feed rations with protein percentages ranging from 21-25. They contain high levels of carbohydrates, are low in fiber, and contain 86-87% total digestible nutrients, making them an excellent livestock feed. In spring or fall, sow alone or mixed with vetch and/or oats, winter rye, or ryegrass. Harvest for grain at 16-18% moisture or when the seeds are hardened and fully mature. Inoculate with Garden Combination Inoculant (#7531) or Pea, Vetch, and Lentil Inoculant (#7534) for best performance.
Harvest
7-14d
Days to harvest
Sun
Full sun to partial shade
Zones
2–11
USDA hardiness
Height
12-18 inches
Planting Timeline
Showing dates for Pea Shoots in USDA Zone 7
All Zone 7 microgreen →Zone Map
Click a state to update dates
Pea Shoots · Zones 2–11
Growing Details
Succession Planting
Pea shoots are a 7-14 day crop, so succession is the whole point. Sow a fresh 10x20 tray every 5-7 days and you'll have a continuous harvest without any single week going bare. Because they grow indoors under lights year-round, there's no season to plan around — just keep the rotation going.
The one variable that disrupts the cadence is heat. If your growing space stays above 75°F, germination gets patchy and damping off risk climbs. In a hot summer kitchen, run a small fan, move trays to a cooler room, or take a 6-8 week break in July and August and pick back up once indoor temps settle below that threshold.
Complete Growing Guide
You'll find pea shoots remarkably forgiving and fast-growing, making them perfect for your first microgreen adventure. Start by soaking your pea seeds for 8-12 hours in lukewarm water—this softens the seed coat and dramatically improves germination rates.
Choose a shallow growing tray (1-2 inches deep) with drainage holes, and fill it with a sterile growing medium like coconut coir or seed-starting mix. Avoid garden soil, which harbors pathogens that can cause damping-off disease. Spread pre-soaked seeds densely across the surface—they should nearly touch but not overlap. You'll use about 1-2 ounces of seeds per 10x20 inch tray.
Cover your seeded tray with a humidity dome or another inverted tray for the first 3-4 days. This creates the dark, humid environment pea seeds crave for germination. Keep the growing medium consistently moist but not waterlogged—mist with a spray bottle twice daily rather than pouring water directly.
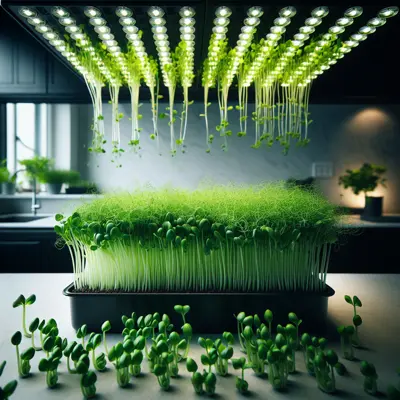
Once shoots reach about an inch tall and push against the cover, remove the dome and move them under bright indirect light or grow lights. Position LED grow lights 6-12 inches above the shoots, running them 12-16 hours daily. Direct sunlight can scorch tender microgreens, so avoid south-facing windows.
The biggest mistake beginners make is overwatering, which leads to root rot and moldy growing medium. Water from the bottom by placing your tray in a larger tray filled with water for 10-15 minutes, allowing the roots to absorb what they need. Never let standing water remain for hours.
For continuous harvests, start new trays every 3-4 days. Each tray will be ready to harvest in 7-14 days depending on temperature—warmer conditions (70-75°F) speed growth while cooler temperatures slow it down. You can maximize yield by ensuring good air circulation with a small fan, which also prevents fungal issues that plague stagnant air environments.
Harvesting
Harvest your pea shoots when they reach 2-4 inches tall with their first set of true leaves fully developed—this typically occurs 7-10 days after germination. The shoots should be bright green with crisp, succulent stems that snap cleanly when bent. Morning harvest provides the sweetest flavor since plants are fully hydrated from overnight rest.
Use clean scissors or a sharp knife to cut shoots about 1/2 inch above the growing medium, leaving the root system intact. Cut in small sections rather than attempting to harvest an entire tray at once, which can bruise tender shoots. The stems should release a fresh, sweet pea aroma when cut—any sour or musty smell indicates the beginning of decay.
Some pea varieties will regrow for a second, smaller harvest if you leave the growing medium undisturbed and continue bottom-watering. However, the second cutting typically has tougher stems and less intense flavor than the first harvest.
Storage & Preservation
Fresh pea shoots are highly perishable and best used within 2-3 days of harvest. Immediately after cutting, rinse shoots gently in cold water and spin dry in a salad spinner or pat with paper towels. Store in the refrigerator at 32-36°F in a perforated plastic bag or container lined with slightly damp paper towels.
For optimal freshness, avoid washing until just before use. Pea shoots don't freeze well due to their high water content—they become mushy and lose their signature crunch. Instead, preserve excess harvest by incorporating into pesto, which freezes beautifully for up to 6 months. You can also dehydrate shoots at 95°F for 6-8 hours to create a concentrated seasoning powder, though this eliminates their fresh texture appeal. The best preservation method is succession planting every few days to ensure continuous fresh harvests rather than dealing with large quantities at once.
History & Origin
Pea shoots represent one of humanity's oldest cultivated foods, with archaeological evidence showing pea consumption dating back 9,000 years in the Mediterranean and Middle East. Ancient Romans and Greeks regularly harvested young pea shoots as spring greens, long before the practice of eating mature peas became common.
The modern microgreen movement, including pea shoots, emerged in California during the 1980s when innovative chefs began garnishing plates with tiny vegetable seedlings. San Francisco restaurants pioneered the use of pea shoots as both garnish and salad ingredient, appreciating their sweet flavor and tender texture.
In Asian cuisines, particularly Chinese cooking, pea shoots (called "dòu miáo") have been a delicacy for centuries. Chinese immigrants brought this culinary tradition to North America, where pea shoots gained popularity in upscale restaurants before transitioning to home gardens. Today's growing interest in microgreens and urban farming has made pea shoots one of the most popular entry-level crops for beginning indoor gardeners.
Advantages
- +Extremely fast harvest cycle of just 7-14 days from seed to table
- +Requires no soil amendments or fertilizers during growing period
- +Grows successfully in minimal space with basic equipment
- +Seeds are inexpensive and widely available year-round
- +Naturally pest-resistant when grown indoors with proper ventilation
- +Provides continuous harvest potential through succession planting
- +Sweet, mild flavor appeals to children and picky eaters
Considerations
- -Very short shelf life of only 2-3 days after harvest
- -Prone to damping-off disease if growing medium stays too wet
- -Cannot tolerate any frost or temperatures below 50°F
- -Requires daily attention to watering and humidity levels
- -Limited preservation options due to high water content
Companion Plants
Pea shoots grown as microgreens don't share soil with companions the way field crops do, but what you grow on the same rack still matters. Lettuce, spinach, and radish microgreens are the natural neighbors — they want the same misting schedule, the same 6.0-7.0 pH range, and the same cool temperatures (55-70°F suits all of them). Radishes in particular finish in 5-7 days, so you can stagger them on the same rack without one crop blocking another's light.
Keep pea shoot trays away from onion and garlic microgreens. Alliums release sulfur compounds that suppress legume germination — NC State Extension documents this allelopathic effect in field settings, and in the tight quarters of an indoor rack the concentrations aren't any lower. Fennel causes the same problem across a wide range of crops; it has no business sharing a humidity dome or a grow-light shelf with peas.
Plant Together
Lettuce
Shallow roots don't compete, provides ground cover and moisture retention
Spinach
Similar growing conditions, helps maximize space efficiency in cool weather
Radishes
Quick-growing, helps break up soil and deters pea root maggots
Carrots
Deep roots complement shallow pea roots, soil aeration benefits both
Chives
Repels aphids and other soft-bodied insects that damage pea shoots
Marigolds
Natural pest deterrent, repels aphids and nematodes
Mint
Deters ants and aphids, but plant in containers to prevent spreading
Nasturtiums
Trap crop for aphids and cucumber beetles, edible flowers complement microgreens
Keep Apart
Onions
Strong sulfur compounds can inhibit pea germination and early growth
Garlic
Allelopathic compounds suppress legume growth and nitrogen fixation
Fennel
Produces allelopathic compounds that inhibit growth of most garden plants
Nutrition Facts
Per 100g serving. % Daily Value based on 2,000 calorie diet. Source: USDA FoodData Central (FDC #167782)
Pests & Disease Resistance
Resistance
Generally disease-free when grown in sterile conditions with proper ventilation
Common Pests
Aphids, fungus gnats (mainly in indoor growing)
Diseases
Damping off, root rot from overwatering
Troubleshooting Pea Shoots
What you'll see, why it happens, and what to do about it.
Seedlings collapsing at the soil line, stems pinching off, usually within the first 4-6 days
Likely Causes
- Damping off (Pythium or Rhizoctonia spp.) — fungal pathogens that thrive in wet, poorly ventilated conditions
- Overwatering combined with low airflow around the tray
What to Do
- 1.Pull the tray immediately and let the medium surface dry slightly between mistings — cut back to once daily if the soil feels wet 1 inch down
- 2.Point a small fan at the trays on low; damping off spreads fast once it starts and airflow slows it considerably
- 3.Start fresh with a sterile seeding mix (not garden soil) and pre-soak seeds for 8 hours before sowing to reduce pathogen load
Shoots are pale yellow-green instead of deep green, even after uncovering the tray on day 4-5
Likely Causes
- Insufficient light — less than 4 hours of direct or strong indirect light daily
- Blackout period extended too long past the point of germination
What to Do
- 1.Move trays to a south-facing window or under a grow light positioned 2-4 inches above the canopy for at least 6 hours a day
- 2.Once shoots hit 1-2 inches tall and the cover comes off, they need light immediately — don't leave them in the dark past that point
Tiny slow-moving insects on the soil surface or around drainage holes, shoots looking stunted around day 8-10
Likely Causes
- Fungus gnats (Bradysia spp.) — larvae feed on roots and organic matter in consistently wet growing medium
- Overwatering that keeps the top layer of soil perpetually damp, which is exactly where adults lay eggs
What to Do
- 1.Let the top 1/2 inch of medium dry out between mistings — fungus gnat larvae can't survive without consistent moisture at the surface
- 2.Place yellow sticky traps flat next to the trays to catch adults before they lay more eggs
- 3.For indoor setups, bottom-water by setting the tray in 1/2 inch of water for 10 minutes instead of misting from above
Clusters of small soft-bodied insects on the growing tips, shoots curling or distorted after day 7
Likely Causes
- Aphids (Acyrthosiphon pisum is common on peas specifically) — more likely if trays are near open windows or infested houseplants
- Warm indoor temps above 75°F speed up aphid reproduction dramatically
What to Do
- 1.Harvest immediately if the shoots are at size — pea shoots at 7-14 days are a cut-and-eat crop; don't wait once aphids appear
- 2.If you're not ready to harvest, knock aphids off with a direct fine mist of cool water and check again in 24 hours
- 3.Keep new trays away from any infested plants and inspect seeds before soaking — aphids can hitchhike on pods or stored seed
Frequently Asked Questions
How long do pea shoots take to grow?▼
Can you regrow pea shoots after cutting?▼
Do pea shoots need special seeds or can I use regular peas?▼
Why are my pea shoots turning yellow?▼
Can pea shoots be grown in regular potting soil?▼
What do pea shoots taste like compared to mature peas?▼
Zone-by-Zone Planting Calendar
| Zone | Indoor Start | Transplant | Direct Sow | Harvest |
|---|---|---|---|---|
| Zone 3 | January – December | — | — | January – December |
| Zone 4 | January – December | — | — | January – December |
| Zone 5 | January – December | — | — | January – December |
| Zone 6 | January – December | — | — | January – December |
| Zone 7 | January – December | — | — | January – December |
| Zone 8 | January – December | — | — | January – December |
| Zone 9 | January – December | — | — | January – December |
| Zone 10 | January – December | — | — | January – December |
| Zone 1 | January – December | — | — | January – December |
| Zone 2 | January – December | — | — | January – December |
| Zone 11 | January – December | — | — | January – December |
| Zone 12 | January – December | — | — | January – December |
| Zone 13 | January – December | — | — | January – December |
Growing Guides from Wind River Greens
Sources & References
External authority sources used in compiling this guide.
See the Methodology page for how this data is sourced, what's AI-assisted, and known limitations.
More Microgreens
Build your planting calendar
Get a month-by-month schedule of when to start, transplant, and harvest.