Mustard Microgreens
Brassica juncea
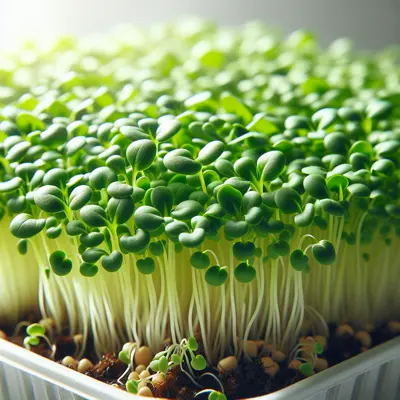
Mustard Microgreens are tender, 1-2 inch seedlings with cotyledons (seed leaves) ranging from pale to bright green depending on variety, featuring fine, hair-like roots. Ready to harvest in just 6-8 days, they deliver an exceptionally sharp, peppery flavor with intense mustard heat and lingering bitterness. These heirloom microgreens stand out for their concentrated pungency—far bolder than mature mustard greens—making them a potent garnish for salads, sandwiches, Asian dishes, and grain bowls where a small amount adds significant spicy bite. Their quick turnaround and minimal space requirements make them ideal for indoor growing.
Harvest
6-8d
Days to harvest
Sun
Full sun to partial shade
Zones
8–12
USDA hardiness
Height
12-18 inches
Planting Timeline
Showing dates for Mustard Microgreens in USDA Zone 7
All Zone 7 microgreen →Zone Map
Click a state to update dates
Mustard Microgreens · Zones 8–12
Growing Details
Succession Planting
Mustard microgreens are one of the few crops where succession planting is the whole point. Sow one 10x20 tray every 2–3 days and you'll have a continuous cut supply instead of a single glut that goes tough before you can use it. At 6–8 days to harvest, even a 2-day stagger means you're never far from the next tray being ready.
There's no season constraint here — these grow indoors year-round under any decent light source. The main thing to watch is that mustard microgreens turn bitter and fibrous fast once the first true leaves push past the cotyledons. Harvest at the cotyledon stage, around day 6–8, and don't let them sit. If a tray gets away from you, cut it and compost it; overgrown mustard microgreens are unpleasant eating.
Complete Growing Guide
Light: Full sun (6 or more hours of direct sunlight a day), Partial Shade (Direct sunlight only part of the day, 2-6 hours). Soil: High Organic Matter. Soil pH: Neutral (6.0-8.0). Drainage: Good Drainage, Moist. Height: 1 ft. 0 in. - 1 ft. 6 in.. Spread: 1 ft. 0 in. - 1 ft. 6 in.. Spacing: Less than 12 inches. Growth rate: Rapid. Maintenance: Medium. Regions: Coastal, Mountains, Piedmont.
Harvesting
Long pods with round, brown seeds. The fruits will dry and split when ripe. The seeds are harvested for use in condiments and oil.
Color: Brown/Copper. Type: Siliqua.
Garden value: Edible
Edibility: The leaves, seeds, flowers, and stems of this mustard variety are edible raw or cooked. Harvested leaves can be stored in the fridge for 3-5 days.
Storage & Preservation
Fresh mustard microgreens maintain peak quality for 3-5 days when stored properly in the refrigerator. After harvesting, gently rinse in cool water to remove any growing medium, then thoroughly dry using a salad spinner or patting with paper towels. Even slight moisture accelerates spoilage.
Store in an airtight container lined with paper towels to absorb excess moisture. Change the paper towels if they become damp. Keep refrigerated at 35-40°F—warmer temperatures cause rapid wilting and nutrient loss.
For longer preservation, consider dehydrating mustard microgreens at 95°F until completely crisp, creating a potent seasoning powder perfect for spice blends. The intense mustard flavor concentrates beautifully through dehydration. Freezing isn't recommended as the delicate cell structure breaks down, creating mushy texture upon thawing. However, frozen mustard microgreens work well blended directly into soups or smoothies where texture isn't critical.
History & Origin
Origin: Russia to central Asia
Advantages
- +Edible: The leaves, seeds, flowers, and stems of this mustard variety are edible raw or cooked. Harvested leaves can be stored in the fridge for 3-5 days.
- +Fast-growing
Companion Plants
The companion list for mustard microgreens is worth reading with some skepticism. Most of the beneficials — radish, lettuce, arugula, spinach, kale — land on the same list because they share nearly identical growing requirements: consistent moisture, 6.0–7.0 pH, tolerant of lower light. In a tray operation, that means you can run them side-by-side on the same shelf without one crop pulling resources from another. Radish is the most practical pairing in practice; it germinates in 1–2 days and finishes fast, so staggering mustard and radish trays by 48 hours gives you two distinct harvests inside a single week. Chives and dill appear as beneficials because they can confuse aphids in a garden bed, but in a 6–8 day tray crop that logic doesn't transfer — they're slower and you'd harvest the mustard long before any pest pressure materialized.
Fennel is the one to take seriously on the harmful side. It produces anethole and related allelopathic compounds that suppress germination and early root development in brassicas, and mustard microgreens spend their entire short life in exactly that vulnerable window. Don't just keep fennel out of adjacent trays — keep it out of the grow area entirely. Black walnut's juglone causes the same kind of germination suppression, but that only matters if you're growing outdoors near an actual tree; it's a non-issue in any indoor setup.
Plant Together
Radish
Both are brassicas with similar growing requirements and pest management needs
Lettuce
Complementary growth habits and can be harvested together in salad mixes
Arugula
Similar spicy flavor profile and identical growing conditions for microgreens
Chives
Natural pest deterrent that protects brassicas from aphids and flea beetles
Cilantro
Attracts beneficial insects and complements mustard's peppery flavor in culinary use
Spinach
Compatible growing requirements and harvest timing for mixed microgreen production
Dill
Attracts beneficial insects while repelling aphids that commonly attack brassica microgreens
Kale
Fellow brassica with identical nutrient and water requirements for microgreen production
Keep Apart
Fennel
Releases allelopathic compounds that inhibit germination and growth of brassica family plants
Sunflower
Produces allelopathic chemicals that can stunt growth of nearby seedlings and microgreens
Black Walnut
Releases juglone toxin that severely inhibits growth and can kill brassica plants
Nutrition Facts
Per 100g serving. % Daily Value based on 2,000 calorie diet. Source: USDA FoodData Central (FDC #167782)
Pests & Disease Resistance
Resistance
Excellent disease resistance due to rapid growth cycle
Common Pests
Flea beetles (rare indoors), aphids
Diseases
Virtually disease-free due to quick harvest time
Troubleshooting Mustard Microgreens
What you'll see, why it happens, and what to do about it.
Seedlings are leggy and pale, stretching toward the light within the first 3-4 days after germination
Likely Causes
- Insufficient light — less than 4 hours of direct or bright indirect light per day
- Blackout period extended too long before moving trays to light
What to Do
- 1.Move trays to your brightest south-facing window or set up a grow light 2-3 inches above the tray, running it 12-16 hours per day
- 2.Once you see the seed hulls lifting, get them under light immediately — don't wait for full germination across the whole tray
- 3.If stems are already stretched, you can't fix this batch; sow again and cut the blackout period short next time
Seedlings germinate fine, then collapse at the soil line within days 3-6, often in spreading patches
Likely Causes
- Damping off complex (Pythium spp. or Rhizoctonia solani) — triggered by overwatering and poor airflow
- Seeding too densely with no air movement, creating a humid microclimate right at the medium surface
What to Do
- 1.Bottom-water only: pour water into the tray beneath the growing medium and let it wick up — never mist the tops once seeds have sprouted
- 2.Run a small fan nearby on low; even gentle airflow cuts damping off dramatically
- 3.Dial back seeding density — about 1 to 1.5 oz of seed per 10x20 tray is plenty for Brassica juncea
Frequently Asked Questions
How long do mustard microgreens take to grow?▼
Do mustard microgreen seeds need to be soaked before planting?▼
What do mustard microgreens taste like?▼
Are mustard microgreens good for beginners?▼
Can you regrow mustard microgreens after cutting?▼
Why are my mustard microgreens getting moldy?▼
Zone-by-Zone Planting Calendar
| Zone | Indoor Start | Transplant | Direct Sow | Harvest |
|---|---|---|---|---|
| Zone 1 | January – December | — | — | January – December |
| Zone 2 | January – December | — | — | January – December |
| Zone 11 | January – December | — | — | January – December |
| Zone 12 | January – December | — | — | January – December |
| Zone 13 | January – December | — | — | January – December |
| Zone 3 | January – December | — | — | January – December |
| Zone 4 | January – December | — | — | January – December |
| Zone 5 | January – December | — | — | January – December |
| Zone 6 | January – December | — | — | January – December |
| Zone 7 | January – December | — | — | January – December |
| Zone 8 | January – December | — | — | January – December |
| Zone 9 | January – December | — | — | January – December |
| Zone 10 | January – December | — | — | January – December |
Growing Guides from Wind River Greens
Sources & References
External authority sources used in compiling this guide.
See the Methodology page for how this data is sourced, what's AI-assisted, and known limitations.
More Microgreens
Build your planting calendar
Get a month-by-month schedule of when to start, transplant, and harvest.