Arugula Microgreens
Eruca sativa
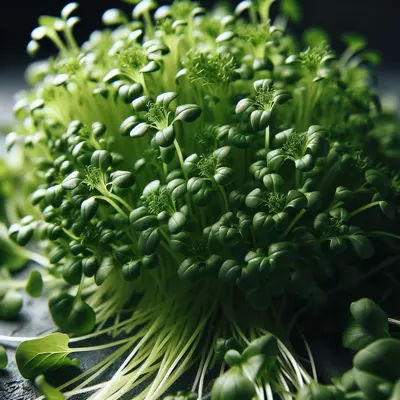
Arugula microgreens are delicate, tender seedlings featuring deeply lobed, emerald-green leaves with a distinctive peppery bite. Ready to harvest in 10-15 days, they develop their signature intensely spicy, nutty flavor profile while remaining at the microgreen stage. These heirloom varieties offer a concentrated version of mature arugula's peppery notes, making them ideal for garnishing salads, sandwiches, and upscale dishes. The microgreen format provides nutrient density and visual appeal in minimal space, thriving under moderate light or grow lights. Easy to cultivate in seed starting mix or coconut coir, they're an excellent choice for home growers seeking quick, flavorful greens with minimal pest concerns.
Harvest
10-15d
Days to harvest
Sun
Moderate light
Zones
2–11
USDA hardiness
Height
0-3 feet
Planting Timeline
Showing dates for Arugula Microgreens in USDA Zone 7
All Zone 7 microgreen →Zone Map
Click a state to update dates
Arugula Microgreens · Zones 2–11
Growing Details
Succession Planting
Arugula microgreens turn around in 10 to 15 days, so succession is just a matter of staggering sow dates by 5 to 7 days. Start a new tray every 5 days and you'll have a continuous harvest with no gap. At 0.5–1 oz of seed per 10x20 tray, that's a manageable seed budget even if you're running 4 or 5 trays at a time.
Because these are grown indoors under lights, there's no seasonal ceiling — January through December works fine. The one variable that shifts is ambient room temperature: if your grow space climbs above 78°F in summer and isn't climate-controlled, expect more bitterness and faster development at the cotyledon stage. In that case, shorten your cycle to 9–11 days and harvest a touch early rather than chasing a more forgiving temperature.
Complete Growing Guide
Growing arugula microgreens requires minimal setup but attention to detail for maximum yields. Start with a shallow growing tray with drainage holes, or use a solid tray with a perforated insert to prevent waterlogging.
Prepare your growing medium by moistening seed starting mix or coconut coir until it holds together when squeezed but isn't dripping. Fill your tray with about 1 inch of medium, creating a smooth, level surface. The key to successful arugula microgreens is even moisture distribution from day one.
Sow seeds densely across the entire surface – you want roughly 1-2 tablespoons per 10x20 inch tray. Don't worry about spacing; microgreens thrive when grown thick. Gently press seeds into the medium using another flat tray, ensuring good seed-to-soil contact without burying them deeply. Mist the surface lightly and cover with an opaque lid or inverted tray to create darkness for germination.
Place your covered tray in a location with temperatures between 65-75°F. Check daily and mist if the surface appears dry, but avoid overwatering – the number one killer of microgreens is damping off from excess moisture. You'll see germination within 2-3 days.
Once seeds germinate and cotyledons appear, remove the cover and provide light. LED grow lights work best, positioned 12-18 inches above the tray for 12-14 hours daily. If using a sunny windowsill, choose east or west-facing windows to avoid scorching the delicate seedlings.
Stop misting once true leaves begin forming – usually day 4-5. Instead, water from below by placing your perforated tray in a solid tray with about ¼ inch of water. Let the medium absorb moisture from below, then drain excess water after 10-15 minutes.
Avoid fertilizing entirely – the seed's stored energy provides all nutrients needed for this short growing cycle. Common mistakes include overwatering, insufficient air circulation, and harvesting too early when only cotyledons are present. Wait for the first true leaves to develop for optimal flavor and nutrition.
For continuous harvests, start new trays every 3-4 days. This succession planting ensures you'll have fresh arugula microgreens ready when the previous batch is harvested.
Harvesting
Harvest arugula microgreens when the first true leaves are fully developed and the plants stand 1-2 inches tall, typically 7-10 days after sowing. Look for vibrant green cotyledons and at least one set of small, lobed true leaves that show the characteristic arugula shape.
Harvest in the morning when plants are fully hydrated and crisp. Use sharp, clean scissors or a knife to cut stems about ¼ inch above the soil line. Cut in small sections rather than attempting to harvest the entire tray at once – this keeps unharvested portions fresh longer.
The stems should snap cleanly when cut, indicating proper moisture content. Avoid harvesting if the growing medium is overly wet, as this increases the chance of introducing bacteria. Never pull microgreens from the soil, as this can introduce growing medium into your harvest and damage neighboring plants.
Arugula microgreens are ready when they taste intensely peppery but not bitter. If left too long, they become tough and overly spicy. Harvest before any yellowing occurs in the cotyledons, which indicates the plants are beginning to decline in quality.
Storage & Preservation
Fresh arugula microgreens are highly perishable and best used within 3-5 days of harvest. Immediately after cutting, gently rinse in cool water and spin dry in a salad spinner or pat dry with paper towels, removing any growing medium particles.
Store in the refrigerator at 35-40°F in a breathable container – a plastic clamshell with small ventilation holes or a partially open plastic bag works well. Place a slightly damp paper towel in the container to maintain humidity without creating excess moisture that causes rot.
For longer storage, arugula microgreens can be frozen, though texture changes significantly. Flash freeze on a baking sheet, then transfer to freezer bags for up to 3 months. Use frozen microgreens in cooked dishes like soups, sauces, or smoothies rather than fresh applications.
Dehydrating is another option – use a dehydrator at 95°F until crisp, then store in airtight containers. Dried arugula microgreens make excellent seasoning blends and retain much of their peppery flavor. Unlike mature arugula, microgreens are too delicate for traditional preservation methods like fermenting or canning.
History & Origin
Arugula microgreens represent a modern twist on an ancient Mediterranean vegetable. While arugula (Eruca sativa) has been cultivated since Roman times – the Romans considered it both food and aphrodisiac – growing it as microgreens is a relatively recent innovation.
The microgreens movement began in the 1980s in San Francisco, where high-end chefs like Alice Waters began incorporating these tiny greens as garnishes and flavor enhancers. Arugula was among the first varieties adopted because its bold, peppery flavor translates exceptionally well to the microgreen stage, delivering intense taste in a small package.
Commercial microgreen production exploded in the 1990s as restaurants discovered these nutrient-dense greens could provide concentrated flavors and visual appeal. Arugula microgreens became particularly popular because they offer the sophisticated, peppery bite that chefs love without the sometimes overwhelming intensity of mature arugula leaves.
Today, arugula microgreens bridge traditional Mediterranean cuisine with modern culinary trends. They've democratized gourmet cooking, allowing home gardeners to grow restaurant-quality ingredients in just a week. This accessibility has made arugula microgreens one of the most popular varieties for both commercial growers and home enthusiasts seeking to add bold flavors to their cooking year-round.
Advantages
- +Extremely fast harvest cycle at just 7-10 days from seed to plate
- +Intense peppery flavor that surpasses mature arugula in concentration
- +Thrives in cool conditions making it perfect for winter growing
- +Requires no fertilization due to rapid growth cycle
- +High germination rate of 90%+ with proper moisture management
- +Naturally pest-resistant due to short growing period
- +Dense sowing means maximum yield per square foot of growing space
Considerations
- -Extremely short shelf life of only 3-5 days after harvest
- -Sensitive to overwatering which quickly causes damping off
- -Flavor can become overpoweringly spicy if harvested too late
- -Cannot be regrown after harvest like some cut-and-come-again microgreens
- -Requires daily monitoring during the critical germination phase
Companion Plants
Arugula microgreens are grown in trays, not in-ground, so traditional companion planting doesn't apply the way it does in a field bed. If you're running a rack system, though, what you grow next to arugula does matter — mainly because of airflow and ethylene off-gassing. Maturing basil microgreens produce ethylene, and trays sitting directly adjacent to arugula can nudge the greens toward early yellowing. Keep at least one shelf between them. Radish is a natural rack neighbor: it germinates in 2–3 days (same as arugula), runs best at 65–72°F, and needs the same misting cadence, which keeps your watering schedule from getting complicated.
Fennel is the one to keep on a separate rack. In soil, fennel is allelopathic — its roots release compounds that suppress neighboring plants — but in a tray setup the problem is simpler and more immediate: fennel microgreens carry a strong anise volatile that drifts into adjacent trays during harvest and storage and muddies arugula's clean, peppery profile. In our zone 7 Georgia operation, we learned that the hard way on a mixed-flavor sampler pack, and fennel hasn't shared a rack with arugula since. Black walnut's juglone suppression is a soil-contact issue and irrelevant to indoor tray production — don't let that one keep you up at night.
Plant Together
Basil
Repels aphids and flea beetles that commonly attack arugula, enhances growth
Lettuce
Similar growing conditions and harvest timing, efficient use of growing space
Radish
Quick germination helps break soil crust, deters flea beetles from arugula
Chives
Natural pest deterrent against aphids and other soft-bodied insects
Spinach
Compatible cool-season crop with similar water and light requirements
Cilantro
Attracts beneficial insects and has complementary growth habits
Dill
Repels aphids and cabbage worms, attracts beneficial predatory insects
Marigold
Natural nematode control and general pest deterrent through root secretions
Keep Apart
Fennel
Allelopathic compounds inhibit germination and growth of most brassicas
Tomato
May stunt arugula growth through root competition and chemical inhibition
Black Walnut
Juglone toxicity severely inhibits growth and can kill sensitive plants like arugula
Nutrition Facts
Per 100g serving. % Daily Value based on 2,000 calorie diet. Source: USDA FoodData Central (FDC #167782)
Pests & Disease Resistance
Resistance
Generally disease-free with quick growing cycle
Common Pests
Flea beetles, aphids (minimal issues in microgreen production)
Diseases
Damping off from overwatering
Troubleshooting Arugula Microgreens
What you'll see, why it happens, and what to do about it.
Seedlings collapse at the base and fall over, usually between day 2 and day 5 after germination
Likely Causes
- Damping off (Pythium or Rhizoctonia spp.) — fungal rot triggered by standing moisture at the stem base
- Overwatering or misting too heavily, especially in trays with poor drainage
What to Do
- 1.Back off to misting once daily and make sure your tray has drainage holes — no standing water under the medium
- 2.Throw out the affected tray; damping off spreads fast and there's no saving a half-collapsed flat
- 3.Start fresh with a clean tray, use a sterile soilless medium, and put a thin layer of vermiculite on top to keep the surface from staying wet
Greens are leggy and pale yellow-green, reaching 3+ inches tall before the first true leaf appears
Likely Causes
- Insufficient light — grow lights positioned too high or a window getting fewer than 10 hours of usable light
- Keeping the blackout dome on past day 3, after most seeds have already popped
What to Do
- 1.Drop grow lights to 2–4 inches above the tray canopy and run them 12–14 hours per day
- 2.Pull the blackout dome as soon as 80% of seeds have germinated — usually day 2 or 3
- 3.If you're using a south-facing window in winter, supplement with even a basic LED strip; natural light alone rarely cuts it December through February
Greens taste overwhelmingly sharp or acrid — more bite than the variety should have, harvested around day 12–14
Likely Causes
- Heat stress — arugula microgreens grown above 75°F produce more glucosinolates, which amplifies bitterness
- Harvesting too late, past day 15, when the first true leaves have started opening
What to Do
- 1.Move trays to a cooler spot — 65–72°F is the target range for balanced flavor
- 2.Harvest at the cotyledon stage (day 10–12) before true leaves emerge; that's when peppery flavor is sharpest but not punishing
- 3.Rinse harvested greens in cold water and spin dry — it mellows the bite slightly and they keep better in the fridge
Tiny pinholes or ragged edges on cotyledon leaves, more noticeable on trays grown outdoors or near open windows
Likely Causes
- Flea beetles (Phyllotreta spp.) — they're small, jump when disturbed, and make quick work of thin microgreen leaves
- Aphid colonies on the undersides of leaves, though NC State Extension notes this is minimal in typical indoor microgreen production
What to Do
- 1.Move trays indoors or cover outdoor trays with a fine insect mesh — flea beetles won't cross it
- 2.At the microgreen scale, you're harvesting in 10–15 days anyway; if damage is minor, pull the tray a day early rather than spraying anything
- 3.For recurring outdoor flea beetle pressure, a yellow sticky trap nearby will tell you how bad the population is before you commit more trays outside
Frequently Asked Questions
How long do arugula microgreens take to grow?▼
Are arugula microgreens good for beginners?▼
Can you grow arugula microgreens without soil?▼
What do arugula microgreens taste like compared to regular arugula?▼
Do arugula microgreens need grow lights or can they grow in a window?▼
Why are my arugula microgreens falling over and dying?▼
Zone-by-Zone Planting Calendar
| Zone | Indoor Start | Transplant | Direct Sow | Harvest |
|---|---|---|---|---|
| Zone 3 | January – December | — | — | January – December |
| Zone 4 | January – December | — | — | January – December |
| Zone 5 | January – December | — | — | January – December |
| Zone 6 | January – December | — | — | January – December |
| Zone 7 | January – December | — | — | January – December |
| Zone 8 | January – December | — | — | January – December |
| Zone 9 | January – December | — | — | January – December |
| Zone 10 | January – December | — | — | January – December |
| Zone 1 | January – December | — | — | January – December |
| Zone 2 | January – December | — | — | January – December |
| Zone 11 | January – December | — | — | January – December |
| Zone 12 | January – December | — | — | January – December |
| Zone 13 | January – December | — | — | January – December |
Growing Guides from Wind River Greens
Sources & References
External authority sources used in compiling this guide.
See the Methodology page for how this data is sourced, what's AI-assisted, and known limitations.
More Microgreens
Build your planting calendar
Get a month-by-month schedule of when to start, transplant, and harvest.