Purple Top
Pisum sativum 'Purple Top'
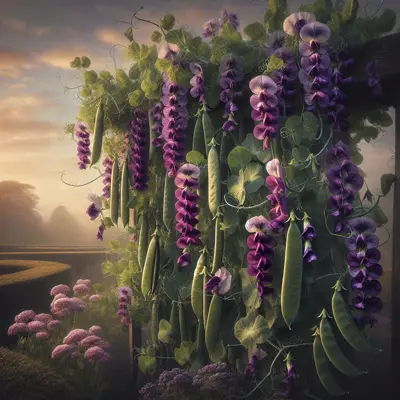
Purple Top is a heirloom pea variety known for its distinctive purple-tinged pod coloring that fades to green at maturity. This early maturing variety reaches harvest readiness in approximately 37 days, producing sweet, tender pods with a delicate, subtle pea flavor. The plants thrive in full sun and well-drained soil enriched with organic matter. Purple Top stands out among heirloom peas for its unique visual appeal and exceptional sweetness, making it a prized choice for both fresh eating and culinary use. The variety is moderately challenging to grow and requires attention to common pea pests including aphids, spider mites, and slugs.
Harvest
37d
Days to harvest
Sun
Full sun
Zones
5–9
USDA hardiness
Height
3 feet
Planting Timeline
Showing dates for Purple Top in USDA Zone 7
All Zone 7 pea →Zone Map
Click a state to update dates
Purple Top · Zones 5–9
Growing Details
Succession Planting
In zone 7, direct sow Purple Top peas every 14–18 days starting around March 1, and stop no later than early May — once daytime highs consistently hit 80°F, germination drops off and powdery mildew pressure climbs fast. At 37 days to harvest, a March 1 sowing should be pulling pods by early April, and a late-April sowing will wrap up before the worst summer heat sets in.
A fall succession is also worth running. Start around mid-August to early September — soil is still warm enough for the 10–14 day germination window, and cooling air as harvest approaches means better pod fill and less disease pressure than you'll see at the spring tail end. Count back 37 days from your first expected frost (typically mid-November in zone 7) to set your latest safe sow date.
Complete Growing Guide
Purple Top peas thrive in cool weather, so timing your planting is crucial for success. Start preparing your garden bed in late winter by incorporating 2-3 inches of well-aged compost and a balanced organic fertilizer into the soil. This heirloom variety performs best in loose, well-draining soil with a pH between 6.0-7.0.
Direct sow your Purple Top seeds 4-6 weeks before your last expected frost when soil temperature reaches 45°F. Soak seeds overnight in room temperature water to improve germination rates, which can be spotty with older heirloom varieties. Plant seeds 1-2 inches deep and 2-3 inches apart in double rows, spacing rows 6 inches apart. This creates a natural support system as plants mature.
Install your trellis system at planting time to avoid disturbing roots later. Purple Top peas are vigorous climbers reaching 5-6 feet tall, so use sturdy 6-foot posts with netting, wire mesh, or string supports. Begin training tendrils to climb when plants reach 4-6 inches tall by gently wrapping them around supports.
Fertilize sparingly since peas fix their own nitrogen. A light application of low-nitrogen fertilizer (5-10-10) at planting is sufficient. Over-fertilizing promotes excessive foliage at the expense of pod production. Side-dress with compost mid-season if plants appear pale or stunted.
Common mistakes include planting too late in spring, over-watering mature plants, and harvesting pods too late. Purple Top peas stop producing in hot weather above 75°F, so in warmer zones (7-9), focus on early spring plantings and consider a fall crop planted 10-12 weeks before first frost. In zones 3-6, you can often get two crops by succession planting every 2-3 weeks through early spring.
Maintain consistent moisture during flowering and pod development, but avoid overhead watering which promotes fungal diseases. Mulch around plants to retain moisture and suppress weeds, keeping mulch 2 inches away from stems to prevent pest harboring.
Harvesting
Harvest Purple Top snow peas when pods are flat, bright green with purple tinges, and approximately 2-3 inches long. The pods should snap crisply when bent, and you should barely see the outline of developing peas inside. Harvest every 1-2 days once production begins, as pods quickly become tough and stringy if left too long.
Test readiness by gently bending a pod – it should snap cleanly rather than fold. If pods feel thick or you can clearly see round pea shapes bulging inside, they've passed prime harvest time for snow peas but can still be shelled for fresh peas.
Harvest in early morning when pods are crisp and full of moisture. Use both hands when picking: hold the vine with one hand while gently pulling pods upward and outward with the other. This prevents damage to the delicate vines and encourages continued production.
Regular harvesting is essential for Purple Top peas – the more you pick, the more they'll produce. Plants can yield for 2-3 weeks with daily harvesting. Stop harvesting when hot weather arrives, as pods become bitter and production ceases.
Storage & Preservation
Fresh Purple Top peas are best used within 2-3 days of harvest for optimal sweetness and crunch. Store unwashed pods in perforated plastic bags in the refrigerator crisper drawer at 32-40°F with high humidity. Avoid washing until ready to use, as moisture accelerates deterioration.
For longer storage, blanch whole pods in boiling water for 2 minutes, then immediately plunge into ice water. Drain thoroughly and freeze in airtight containers for up to 8 months. Frozen snow peas work excellently in stir-fries and cooked dishes.
Dehydrating is another excellent option for Purple Top peas. Blanch briefly, then dry at 125°F until crisp. Dried pea pods rehydrate well in soups and stews, adding both flavor and visual appeal. The purple-tinged pods retain much of their color when properly dried.
Avoid canning snow peas as they become mushy and lose their characteristic crisp texture that makes them desirable.
History & Origin
Purple Top peas trace their lineage to the 1700s, making them one of the oldest documented snow pea varieties in European and American gardens. This heirloom originated in Europe, likely in the Netherlands or England, where edible-podded peas were developed as a luxury vegetable for aristocratic tables.
The variety gained popularity in American colonial gardens by the mid-1700s, prized both for its ornamental purple flowers and exceptional eating quality. Thomas Jefferson, an avid gardener, documented growing purple-flowered peas at Monticello, quite possibly this variety or a close ancestor.
Purple Top represents the intersection of ornamental and culinary gardening that was highly valued in historical kitchen gardens. The purple pigmentation comes from anthocyanins, the same compounds that create color in purple cabbage and eggplant. This trait was carefully maintained by generations of seed savers who appreciated both the visual impact and superior flavor.
During the 19th century, Purple Top peas were commonly grown in market gardens supplying urban areas, but nearly disappeared during the 20th century as commercial agriculture favored uniform green varieties. Today's seeds come from careful preservation efforts by seed savers who maintained this variety through family lines and heritage seed exchanges.
Advantages
- +Stunning purple flowers create exceptional ornamental value while producing food
- +Purple-tinged pods add unique color and visual interest to culinary dishes
- +Exceptional sweet flavor that's noticeably superior to many modern varieties
- +Vigorous climbing habit maximizes production in small garden spaces
- +Cold-hardy variety that germinates and grows in cooler conditions than many peas
- +Long harvest window of 2-3 weeks with proper picking maintenance
- +Self-supporting when planted in double rows, reducing trellising needs
Considerations
- -Limited disease resistance makes it vulnerable to fusarium wilt and powdery mildew
- -Spotty germination rates typical of older heirloom varieties
- -Stops producing abruptly when temperatures exceed 75°F
- -Purple coloring can fade to brown when overcooked, requiring careful preparation
- -More susceptible to pea aphids than modern resistant varieties
Companion Plants
Carrots and radishes are the most practical companions for peas in a small bed. They occupy different root depths — radishes work shallow at 6–12 inches while peas fix nitrogen near the surface — so there's no real competition for the same resources. Radishes also pull flea beetle pressure away from pea seedlings in early spring, acting as a minor trap crop. Carrots can go between rows without crowding, and since Purple Top peas finish before early summer in zone 7 Georgia gardens, the carrots are right where you want them to complete the season on their own.
Lettuce and spinach make sense alongside peas for a different reason: the vines cast partial shade as temperatures climb, slowing bolting in both crops by a week or two. Spinach in particular benefits from that buffer as April turns to May. Tuck marigolds (Tagetes spp.) at the row ends — there's solid field evidence they reduce pea aphid (Acyrthosiphon pisum) colonization, and aphid populations can spike fast once the weather warms past 65°F.
Keep onions, garlic, and gladiolus out of the pea bed entirely. Alliums are thought to suppress the Rhizobium bacteria that colonize pea roots and fix atmospheric nitrogen — which is the main agronomic reason to grow legumes in rotation in the first place. Undermining that with a nearby onion row is a bad trade. Gladiolus shares several foliar diseases with peas and brings nothing useful back. Give both their own space.
Plant Together
Carrots
Peas fix nitrogen in soil that carrots utilize, while carrots don't compete for space
Radishes
Break up compacted soil for pea roots and mature quickly before peas need full space
Lettuce
Benefits from nitrogen fixed by peas and provides ground cover to retain soil moisture
Spinach
Cool-season crop that thrives with pea-fixed nitrogen and similar growing conditions
Marigolds
Repel aphids and other pests that commonly attack pea plants
Mint
Deters ants and mice that may eat pea seeds and pods
Cucumbers
Benefit from nitrogen fixed by peas and can use pea trellises after harvest
Chives
Repel aphids and improve overall garden pest management
Keep Apart
Onions
Can inhibit pea growth and nitrogen fixation through root secretions
Gladiolus
Competes heavily for nutrients and can harbor thrips that damage pea plants
Garlic
May stunt pea growth and interfere with beneficial root bacteria
Nutrition Facts
Per 100g serving. % Daily Value based on 2,000 calorie diet. Source: USDA FoodData Central (FDC #170419)
Pests & Disease Resistance
Resistance
Limited disease resistance typical of heirlooms
Common Pests
Pea aphid, spider mites, pea leaf weevil, slugs
Diseases
Fusarium wilt, powdery mildew, root rot, pea mosaic virus
Troubleshooting Purple Top
What you'll see, why it happens, and what to do about it.
White powdery coating on leaves and stems, usually appearing mid-season as temperatures warm
Likely Causes
- Powdery mildew — a fungal infection that thrives in warm days and cool nights, common as spring stretches toward summer
- Poor airflow from dense planting at less than 4-inch spacing
What to Do
- 1.Strip and trash (don't compost) the worst-affected leaves to slow spread
- 2.Spray with a diluted potassium bicarbonate solution or neem oil before 10 a.m. so leaves dry before the afternoon heat
- 3.Next planting, thin to 6 inches between plants and switch to drip or ground-level watering
Plants wilting and yellowing from the base up despite adequate soil moisture, often affecting one plant while neighbors look fine
Likely Causes
- Fusarium wilt (Fusarium oxysporum f. sp. pisi) — a soilborne fungus that blocks vascular tissue; cut a stem near the base and you'll see brown discoloration inside
- Planting in a bed that grew peas or beans the previous 2–3 seasons
What to Do
- 1.Pull and trash infected plants immediately — they won't recover and the fungus will spread
- 2.Rotate peas out of that bed for at least 3 years; Fusarium persists in soil long after the crop is gone
- 3.Amend with compost to improve drainage — waterlogged soils below pH 6.0 make Fusarium worse
Irregular holes chewed in leaves and seedling stems, damage worst on cloudy mornings or after rain
Likely Causes
- Slugs — they feed at night or on overcast days and hide under mulch and debris during daylight
- Pea leaf weevil (Sitona lineatus) — adults notch leaf edges in a distinctive scalloped pattern, typically heaviest the first 3 weeks after germination
What to Do
- 1.For slugs: scatter iron phosphate bait (Sluggo) around plant bases after watering; reapply after heavy rain
- 2.Pull mulch back 2–3 inches from stem bases to remove slug harborage
- 3.For pea leaf weevil: row cover from germination through the first 3 weeks gives seedlings enough size to outgrow the damage without chemical intervention
Frequently Asked Questions
How long do Purple Top peas take to grow from seed to harvest?▼
Can you grow Purple Top peas in containers?▼
Are Purple Top peas good for beginner gardeners?▼
What do Purple Top peas taste like compared to regular snow peas?▼
When should I plant Purple Top peas in my area?▼
Do Purple Top pea flowers stay purple when cooked?▼
Zone-by-Zone Planting Calendar
| Zone | Indoor Start | Transplant | Direct Sow | Harvest |
|---|---|---|---|---|
| Zone 1 | — | — | June – July | July – September |
| Zone 2 | — | — | May – July | June – September |
| Zone 11 | — | — | January – February | January – December |
| Zone 12 | — | — | January – February | January – December |
| Zone 13 | — | — | January – February | January – December |
| Zone 3 | — | — | May – June | June – October |
| Zone 4 | — | — | April – June | June – October |
| Zone 5 | — | — | April – May | May – November |
| Zone 6 | — | — | April – May | May – November |
| Zone 7 | — | — | March – May | April – November |
| Zone 8 | — | — | March – April | April – December |
| Zone 9 | — | — | February – March | March – December |
| Zone 10 | — | — | January – March | February – December |
Growing Guides from Wind River Greens
Sources & References
External authority sources used in compiling this guide.
See the Methodology page for how this data is sourced, what's AI-assisted, and known limitations.
More Peas
Build your planting calendar
Get a month-by-month schedule of when to start, transplant, and harvest.