Mr. Big
Pisum sativum 'Mr. Big'
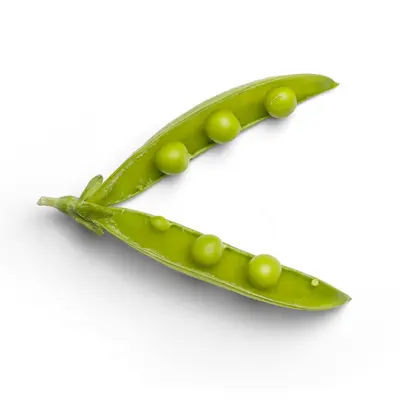
A dwarf variety that lives up to its name with exceptionally large pods packed with plump, sweet peas despite its compact 18-inch height. This bush-type pea is perfect for small gardens and containers, producing impressive yields without the need for staking or trellising. Mr. Big proves that great things really do come in small packages, delivering full-sized flavor in a space-saving plant.
Harvest
60-65d
Days to harvest
Sun
Full sun to partial shade
Zones
2–11
USDA hardiness
Height
12-18 inches
Planting Timeline
Showing dates for Mr. Big in USDA Zone 7
All Zone 7 pea →Zone Map
Click a state to update dates
Mr. Big · Zones 2–11
Growing Details
Succession Planting
Direct sow Mr. Big every 14-21 days starting around March 1 in zone 7, and keep going through early May. Each planting runs about 60-65 days to harvest, so a March 1 sowing comes in around May 1-5, a March 21 sowing around late May, and so on. Stop once daytime highs are consistently hitting 80°F — peas set pods poorly above that threshold, and powdery mildew pressure climbs fast. In most of Georgia, that cutoff lands somewhere in early to mid-May.
You can pick back up with a fall planting. Count 65 days back from your first expected frost (usually mid-to-late November in zone 7) and target a direct sow in mid-to-late September. Soil temperature needs to be below 75°F for reliable germination, so don't rush it — wait for a stretch of cooler nights before putting seed in the ground.
Complete Growing Guide
Mr. Big peas thrive in cool weather, so timing is everything. Start by preparing your planting area 2-3 weeks before your last expected frost date. Choose a spot that receives 6-8 hours of sunlight daily, though Mr. Big tolerates partial shade better than most pea varieties, making it excellent for gardens with morning sun and afternoon protection.
Work compost into your soil to improve drainage—peas hate waterlogged conditions but need consistent moisture. Avoid high-nitrogen fertilizers at planting, as peas fix their own nitrogen and excess can delay flowering. A balanced 10-10-10 fertilizer worked into the soil at planting is sufficient for the entire growing season.
Direct sow seeds 1.5 inches deep and 2-3 inches apart. Unlike tall pea varieties, you can plant Mr. Big in blocks or wide rows since they won't shade each other out at 18 inches tall. In zones 3-5, plant as soon as soil can be worked in spring. Zones 6-7 gardeners can succession plant every 2 weeks through early April for continuous harvests. Zone 8+ gardeners should focus on fall planting, sowing 10-12 weeks before first frost.
Skip starting indoors—peas transplant poorly and direct seeding gives better results. If soil temperature is below 45°F, consider using row covers to speed germination, which typically takes 7-10 days in cool soil.
The biggest mistake with Mr. Big is overwatering. Water deeply when the top inch of soil feels dry, typically twice weekly once established. During flowering and pod development, maintain consistent moisture but ensure good drainage to prevent root rot.
To maximize your 60-65 day harvest window, side-dress with compost when plants begin flowering. Mr. Big's compact habit means you can interplant with lettuce or radishes early in the season. The plants will naturally bush out to fill their space, requiring no staking or support structures.
Harvesting
Begin checking your Mr. Big pods around day 55, though peak harvest typically occurs between days 60-65. The pods are ready when they're bright green, plump, and approximately 4-5 inches long—notably larger than standard dwarf varieties. Perform the 'squeeze test': gently press the pod between your thumb and finger. You should feel distinct, rounded peas inside without the pod feeling tough or leathery.
Harvest in the morning when pods are crisp and full of moisture. Grasp the pod near its stem attachment and pull with a gentle twisting motion, or use scissors to avoid damaging the plant. Mr. Big produces over a 2-3 week window, so check plants every other day during peak season. The bottom pods mature first, working upward.
Avoid pods that feel flat, have begun turning pale, or make a rattling sound when shaken—these are past prime. However, don't harvest too early when pods feel soft and peas haven't fully developed inside. Regular harvesting encourages continued production from this determinate variety.
Storage & Preservation
Fresh Mr. Big peas maintain peak sweetness for only 24-48 hours after harvest, so process quickly. Store unwashed pods in perforated plastic bags in your refrigerator's crisper drawer at 32-35°F. They'll keep 5-7 days, though sweetness diminishes daily as sugars convert to starch.
For longer storage, shell peas immediately and blanch in boiling water for 2 minutes, then plunge into ice water. Drain thoroughly and freeze in portions. Mr. Big's large, plump peas freeze exceptionally well, maintaining texture better than many varieties. Properly frozen peas keep 8-12 months.
Dehydrating is another excellent option—blanch briefly, then dry at 125°F until wrinkled and hard. Store dried peas in airtight containers for soups and stews. The concentrated sweetness of Mr. Big makes it particularly good for drying, creating intensely flavored additions to winter cooking.
History & Origin
Mr. Big was developed in the late 1990s by American seed breeders responding to the growing container gardening movement and smaller urban spaces. This hybrid variety represents the culmination of decades of breeding work to combine the compact growth habit of traditional dwarf peas with the pod size and yield of full-sized varieties.
The variety was specifically bred to address the common complaint that dwarf peas, while space-efficient, often produced disappointingly small pods and yields. Breeders crossed compact determinate varieties with large-podded cultivars, selecting for plants that maintained short stature while dramatically increasing pod size and pea count per pod.
Mr. Big gained popularity in the early 2000s as urban and container gardening exploded. Its development reflects the broader trend in vegetable breeding toward varieties suited for small-space growing without sacrificing productivity. The name 'Mr. Big' was chosen to emphasize the variety's key selling point—surprisingly large production from a small plant, playing on the contradiction between its compact size and substantial harvest potential.
Advantages
- +Exceptional pod size for a dwarf variety—4-5 inches with 8-9 peas per pod
- +No staking or support needed, perfect for container growing in 12+ inch pots
- +Concentrated harvest window makes processing and preservation manageable
- +Superior fusarium wilt resistance compared to many heirloom pea varieties
- +Maintains sweetness longer after harvest than standard shelling peas
- +Tolerates partial shade better than most pea varieties
- +Determinate growth habit allows succession planting in small spaces
Considerations
- -Hybrid variety means seeds cannot be saved for next year's planting
- -More susceptible to powdery mildew in humid conditions than some varieties
- -Shorter harvest window compared to indeterminate climbing peas
- -Higher seed cost per packet compared to open-pollinated varieties
- -Can be prone to aphid infestations on tender growing tips
Companion Plants
Carrots and radishes are the most practical companions for Mr. Big. Radishes germinate in 5-7 days and can be tucked right between pea rows — they're pulled long before peas hit 12-18 inches and start shading anything out. Carrots occupy a deeper root zone, so the two don't compete much for water or nutrients at the same soil level. Lettuce and spinach work for the same reason: shallow-rooted, cool-season crops that share the bed without crowding, and they pick up a bit of protection from the light shade peas cast once April temperatures start moving.
Nasturtiums and chives are worth including for pest management. Nasturtiums are known to pull pea aphids (Acyrthosiphon pisum) off the main crop and bring in predatory wasps and ladybugs that work through the whole planting. In our zone 7 Georgia garden, aphid pressure tends to show up by mid-April, so getting nasturtiums in the ground at your March sowing — not as an afterthought — is what makes the difference. Chives serve a similar deterrent role and take up almost no space at the row edge.
Onions and garlic are the ones to site elsewhere. Both release sulfur compounds that inhibit the Rhizobium bacteria living on pea roots — the same bacteria doing the nitrogen-fixing work that makes legumes worth rotating through your beds in the first place. There's no upside to putting alliums next to a nitrogen fixer; save that bed space for something that won't undercut what peas are actually good at.
Plant Together
Carrots
Peas add nitrogen to soil that carrots need, while carrots break up soil for pea roots
Lettuce
Provides living mulch and uses space efficiently while peas climb
Radishes
Quick-growing radishes loosen soil and can be harvested before peas need full space
Spinach
Cool-season companion that benefits from nitrogen fixed by peas
Chives
Natural pest deterrent that repels aphids without competing for nutrients
Marigolds
Attract beneficial insects and deter harmful pests like aphids and thrips
Mint
Repels ants and rodents that may damage pea seeds and pods
Nasturtiums
Trap crop for aphids and cucumber beetles while attracting pollinators
Keep Apart
Onions
Can inhibit pea growth and nitrogen fixation through root secretions
Garlic
Allelopathic compounds can stunt pea growth and reduce pod production
Gladiolus
Competes heavily for nutrients and can harbor thrips that damage pea plants
Nutrition Facts
Per 100g serving. % Daily Value based on 2,000 calorie diet. Source: USDA FoodData Central (FDC #170419)
Pests & Disease Resistance
Resistance
Good resistance to fusarium wilt and common pea mosaic virus
Common Pests
Aphids, pea weevils, leafminers
Diseases
Powdery mildew, root rot, bacterial blight
Troubleshooting Mr. Big
What you'll see, why it happens, and what to do about it.
White powdery coating on leaves and stems, usually appearing as plants approach 55-60 days and temperatures start climbing
Likely Causes
- Powdery mildew — a fungal disease that thrives in warm, dry days with cool nights and poor airflow
- Crowded planting at less than 4-inch spacing that traps humidity around foliage
What to Do
- 1.Pick off the worst-affected leaves and bin them — don't compost them
- 2.Thin plants to at least 4-6 inches apart so air can move through
- 3.If it spreads fast, apply a diluted neem oil spray in the evening (not midday) every 7 days until pods are done
Stems collapsing at soil level, roots turning brown and mushy — plants dying in patches rather than uniformly
Likely Causes
- Root rot from Pythium or Fusarium — both thrive in cold, waterlogged soil, easy to create if you direct sow into heavy clay before it drains well in March
- Overwatering during germination before the 7-12 day window is up
What to Do
- 1.Pull the collapsed plants — they won't recover — and don't replant peas in that same spot this season
- 2.Amend heavy beds with compost before the next sowing to improve drainage; peas want 1-1.5 inches of water per week during pod fill, not before
- 3.Rotate peas out of any bed that had root rot for at least two seasons
Clusters of soft, pale green or black insects on growing tips and undersides of leaves, sticky residue on stems
Likely Causes
- Pea aphid (Acyrthosiphon pisum) — colonizes fast once it finds a flush of new growth
- Absence of predatory insects, which can happen early in the season before beneficials establish
What to Do
- 1.Knock aphids off with a strong stream of water from a hose — two or three mornings in a row usually breaks the colony
- 2.If the infestation is heavy, spray insecticidal soap directly on the colonies; coat the undersides of leaves where they hide
- 3.Get nasturtiums in the ground alongside your next pea sowing — they draw in ladybugs and parasitic wasps that work through the whole bed
Frequently Asked Questions
How long does Mr. Big pea take to grow?▼
Can you grow Mr. Big peas in containers?▼
Is Mr. Big pea good for beginners?▼
What does Mr. Big pea taste like?▼
When should I plant Mr. Big peas?▼
Do Mr. Big peas need support or trellising?▼
Zone-by-Zone Planting Calendar
| Zone | Indoor Start | Transplant | Direct Sow | Harvest |
|---|---|---|---|---|
| Zone 3 | — | — | May – June | July – October |
| Zone 4 | — | — | April – June | June – October |
| Zone 5 | — | — | April – May | June – November |
| Zone 6 | — | — | April – May | June – November |
| Zone 7 | — | — | March – May | May – November |
| Zone 8 | — | — | March – April | May – December |
| Zone 9 | — | — | February – March | April – December |
| Zone 10 | — | — | January – March | March – December |
| Zone 1 | — | — | June – July | August – September |
| Zone 2 | — | — | May – July | July – September |
| Zone 11 | — | — | January – February | February – December |
| Zone 12 | — | — | January – February | February – December |
| Zone 13 | — | — | January – February | February – December |
Growing Guides from Wind River Greens
Sources & References
External authority sources used in compiling this guide.
See the Methodology page for how this data is sourced, what's AI-assisted, and known limitations.
More Peas
Build your planting calendar
Get a month-by-month schedule of when to start, transplant, and harvest.